Sunday, October 30, 2011

Cake Walk Goodies ~~Ideas I got from Pinterest!

Last Friday was a Halloween Carnival at my kids' school.  I had to bake a couple of somethings for a cake walk and so I scoured Pinterest for ideas.  I ended up making this:


 which is a take-off of this:
Found this at Nothing But Country

And this:
Brownies with Buttercream Frosting Brains

Just brownies and buttercream "brains"

which is a take-off of this:

Found this on Living Locurto
Obviously, I used her free printables, too!


For me, this was a multi-day project.  My first hurdle was finding the cups and lids.

I finally found the cups and lids at one (of the five near me) Sam's Club.  Even though I didn't want the domed lids, I had to take anything I could find and make it work.

Then of course, there was lots of baking, frosting making, decorating, and paper cutting to do.  But the hardest part was keeping the spoons stuck on the cups.  Not sure what I was doing wrong.  I used glue dots and curling ribbon.  For a day and a half all I did was reaffix ribbon and spoons.  So even though I have 450 domed lids left over, I will not make these again until I can figure out something better for the spoons.


All the goodies ready to go to school!  3,000 glue dots later!

Linking Here:
craft MakingThe Girl CreativeKeeping It Simple

Thursday, October 27, 2011

And the Liebster Awards Go to...

Again, Thank you to Michele at The Domesticated Mama for nominating me for the Liebster Blog Award.

Like I said yesterday, I had never heard of "Liebster".  I read on Michele's blog that it highlights up-and-coming bloggers who have less than 200 followers.  So I fit right in to that category!  You can google Liebster blog and see what other blogs have won the award.

I am calling it a "share the love award" because I think that is basically what it is.  And remember, who doesn't love "love"?

I also think this is a way to connect with other new bloggers and tell each other, don't give up just because we aren't big-time (yet).  So now that I have accepted this award, I have also accepted the responsibilities that go along with it.

There are rules, in fact.
1. Show your gratitude to the blogger who gave you the award by linking back to them.
2. Reveal your top 5 picks and let them know by leaving a comment on their blog.
3. Post the award on your blog.
4. Bask in the love from the most supportive people on the Internet - other writers (and in this case, a fellow Mama!)
5. Best of all...have fun!!

Here are my picks for the Liebster Blog Award:  
1.  Kashoan at Krafty Kash
This girl was the first blogger to reach out to me.  She even invited me to do a guest post which I totally flaked on and never seemed to work up the nerve to do! But she is awesome!  She is a clever mother, etsy shop owner, and she is already taking her blog to the next level!  


2.  Amanda at The Little Giggler
Amanda was so kind to feature me on her blog. I think that was my first feature, too! She is super creative.  She comes up with things my brain would never come up with even if I tried really hard to think of something crafty!  She has a tad over 200 followers...I really wanted to award her anyways.

3.  Bethany at Pitter and Glink
A high school English teacher by day and crafter slash blogger the rest of the time.  I.love.it!  I think I would like teaching high school math someday...she could give me pointers on the big kids, since mine are very young.  Bethany has already done some really smart things with her blog!  Her blog looks great.  Her content is great!  Her photos are great!  She nailed it with a creative blog name.  She will be one to watch.

4.  Anna at Directions Not Included
Anna and her husband are remodeling their 1950s house and sharing all the details on their blog.  I love those home DIY shows on tv so this is just like that, for me.  I dream of one day gutting a house, or just a kitchen, to make it mine.  Anna also has lots of crafty ideas that she shares in between the major remodeling stuff (just blows me away!).  She is at 199 followers---you go girl!!

5.  Val at Living Out of the Box
Now, this is not a craft of DIY blog.  This is a blog about living life to the fullest!  Valerie is my dear, dear friend!  After you read her blog, you will wonder how I even know someone this awesome!  I know!  Val is living a dream life- jaunting between Colorado and Italy to study wine, language, and culture!  I met Val some 10 or so years ago when we were both Lieutenants in the Air Force!  But until she started writing on her blog, I really had no clue that she was such a TALENTED writer.  I bet she will write a book one day- something funny, for women, relatable, and brutally honest.  Check out her blog for some good reading!  Love you, girl!!

Hope you will agree with my picks.  Give them some love by following them, too!


Tuesday, October 25, 2011

Liebster Award? for me? That's Right!!

So.  Today, I am just doing the usual stuff...minding my own business...and I get this email.  From this gal.  Michele. Over at The Domesticated Mama.  And you will not believe what she said...Here, she was so incredibly kind to nominate my blog as an "up and coming blog" and awarded me with the Liebster Award.  I *heart* you too, Michele!

So honestly, I was a bit nervous.  I mean, Liebster- what is that?  So I googled it.  Yahoo-ed it, actually.  Could not find an origin for this.  I started to wonder if this was a joke.  But I found pages and pages of blogs that have received this award too.  And in turn, those bloggers nominate more bloggers for this award.  That's how it works.

So, in my translation, the Liebster Blog Award is simply a Share the Love Award!!

Who doesn't love "love"?  Well I do.  And it is so funny, this blogging thing.  Each time I have a day where I just think:
"I am typing an typing and I don't know if anyone is reading.  I am linking and linking and I am not even sure if anyone is really interested in what I am making.  I stay up late sometimes editing pictures and posts - for what?"  
... and not just anytime, but everytime I have a day like that I get some kind of reaffirmation the very.next.day.  It is that nudge that keeps me going.  It is the connections that I have made via blogging and commenting and featuring that am so grateful for.  My goal here is simple:  keep a blog to log my crafts, share ideas, and vent if I want to.  It's not my job.  I have a family.  My kids are busy.  I like my sleep.

Sorry to get a tad serious but it's true.  It was nice to get some positive words after my 2 hour trip to the grocery store today!  Not because I was buying so much food.  Nope.  My newly potty-trained 2yr old always has to pee!  He "need go potty" every other aisle, I think.  I even cut his drinking off an hour before today.  Oh well.  It's better than diapers...

Tomorrow I will nominate my Liebster Award Winners.  It is after 10pm as I write this.  And remember that part, where I like my sleep?  Well that's where I am headed now : )

Monday, October 24, 2011

{Bucket List}:: #28 Zucchini Fritters - made and eaten!

Yes, I really did scratch another one off my Craft Bucket List!  Woot woot!


This one, I know is kinda weird for a bucket list...I mean, it's zucchini!  But, I really like zucchini.  I do wonder if it has anything to do with the one summer, when I was a kid, when the zucchini from our garden were the size of your thigh!!  And we had tons of them!  I remember we started calling them "zukes" for short.  My mom cooked it every which way possible.  She even hid it in recipes just so it wouldn't go to waste.  We had enough zucchini bread in our freezer to feed every family on our street (if we shared, that is! YUM!)  Maybe that's why I like it.  Or, maybe it is that zucchini is such a neutral flavored veggie that I can pair it with any kind of meal.  Ok, that and the zucchini bread!


But I was really excited to see a *new* way to cook up my favorite squash.  Kelly at Creating a Family Home posted this very easy zucchini recipe and I just could not resist.  The basic recipe was simple:  zucchini, breadcrumbs, eggs, herbs of your choice, and garlic.


So, Completed:  #28. Zucchini Fritters {@ Creating a Family Home}
This is what mine looked like mixed up.  Probably a little too wet.  I had a giant zucchini so I added more breadcrumbs.  Then to compensate for the dryness, I added an extra egg.  Maybe it was too much.

Here is a round of fritters in the pan...

And here are some burnt-looking fritters with a meatball sub.  They were not burnt tasting though!  They were really good.  I really tried not to brown them up but I couldn't help it.  It doesn't bother me, but my son always complains if food has black on it (even grilled hot dogs).


I just picked up a 3-pack of zucchini today at the store for 99 cents!  I bet I will make these again this week.   I am happy to have a new side dish to add to my repertoire!

Wednesday, October 19, 2011

Simple, Real Simple Recipes

You know the magazine, Real Simple, right?

Did you see in last month's issue, they featured a month of easy dinner recipes?  They have invited their readers to follow along with their staff and make the recipes- their staff will be blogging all about it.  I looked at the recipes, and since they are healthy and yes, easy, I have decided to try them out.  They even made a printable shopping list for each week!  I mean, this might be easy enough for even me!

All of their photos just look so pretty.  And just from a photo, you know the ingredients!  No creamy mystery sauces or veggies hiding in cheese.  Fresh proteins.  Fresh veggies.  Fresh herbs.  A natural approach to flavor, I suppose you can say.

My plan is to select one or two each week to try out.  I will only be making ones I think have potential to be made again and again.  Which means, they have to pass the kid-test.  And the lazy-chef test.

I thought I would review the recipes that I have made here.  Real Simple is a very popular magazine so maybe you already saw the "Month of Dinners" article, the gorgeous photos, but haven't yet tried them out.  


Recipe From Real Simple:

Ingredients

Directions

  1. Heat oven to 450° F. On 2 rimmed baking sheets, toss the squash and mushrooms with the sage, oil, ½ teaspoon salt, and ¼ teaspoon pepper. Roast, tossing once and rotating pans halfway through, until the vegetables are tender, 20 to 25 minutes.
  2. Meanwhile, cook the tortellini according to the package directions. Reserve ½ cup of the cooking water; drain the tortellini and return to the pot. Add the vegetables, fontina, ¼ cup of the cooking water, and ½ teaspoon salt and toss gently to coat (add more cooking water if the pasta seems dry). Sprinkle with additional fontina

I was so proud- I tried my very best to follow all the directions to the T!  I did alter a couple of ingredients but only slightly.  I just used a package of pre-sliced non-fancy mushrooms.  I also used dried sage (rubbed sage to be exact) instead of the fresh because that is what I already had.  I probably over-seasoned the veggies, but man oh man, they were SO good.  

Kate's Two Cents:  Super easy.  Few ingredients.  Everyone loved it!  

Next time I will:  not mix the veggies until *just* before serving.  I felt like I was bruising the squash when I mixed it up.  

In case you wondered...it did not look like the picture!  I love the presentation of a meal just as much as the taste.  I think next time, I will show you the "real-life" pictures of what the dinners look like.  

Monday, October 17, 2011

{Tutorial} For the Love of Monkey Bars Shorts (aka Bike Shorts)


My daughter, Stella, loves the monkey bars!  To my shock, she is pretty darn awesome at zipping across them, too!  
She also happens to love wearing dresses.  
Which don't go well with being monkey-like.  
Enter...the *For the Love of Monkey Bars* Shorts.  

A few weeks ago, I saw an awesome tutorial to make leggings using just two pieces of fabric, at Make It and Love It - One of my all*time FAVORITE blogs.  That girl, Ashley, has THE best ideas!  Not only was this tutorial perfect because my daughter loves leggings, but I *needed* an excuse (and some encouragement!) to sew with my twin needle.


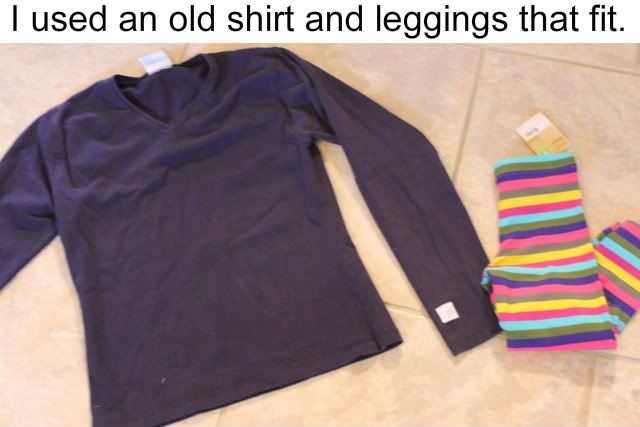
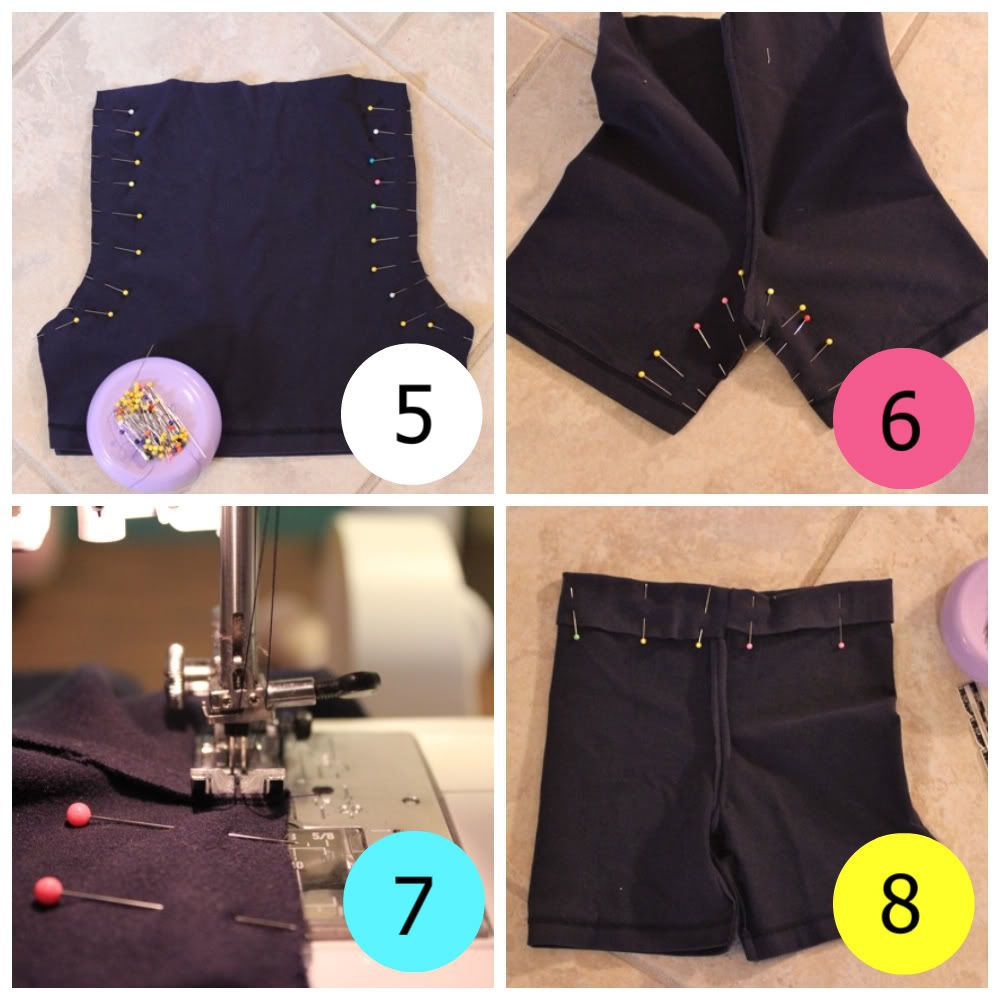
**Tip 1:  I chose an old shirt and used the bottom hem as the hem on the shorts.  One less step!  
**Tip 2:  I used the stripes as my guide for how long the shorts should be (ie hem should be at the blue stripe).

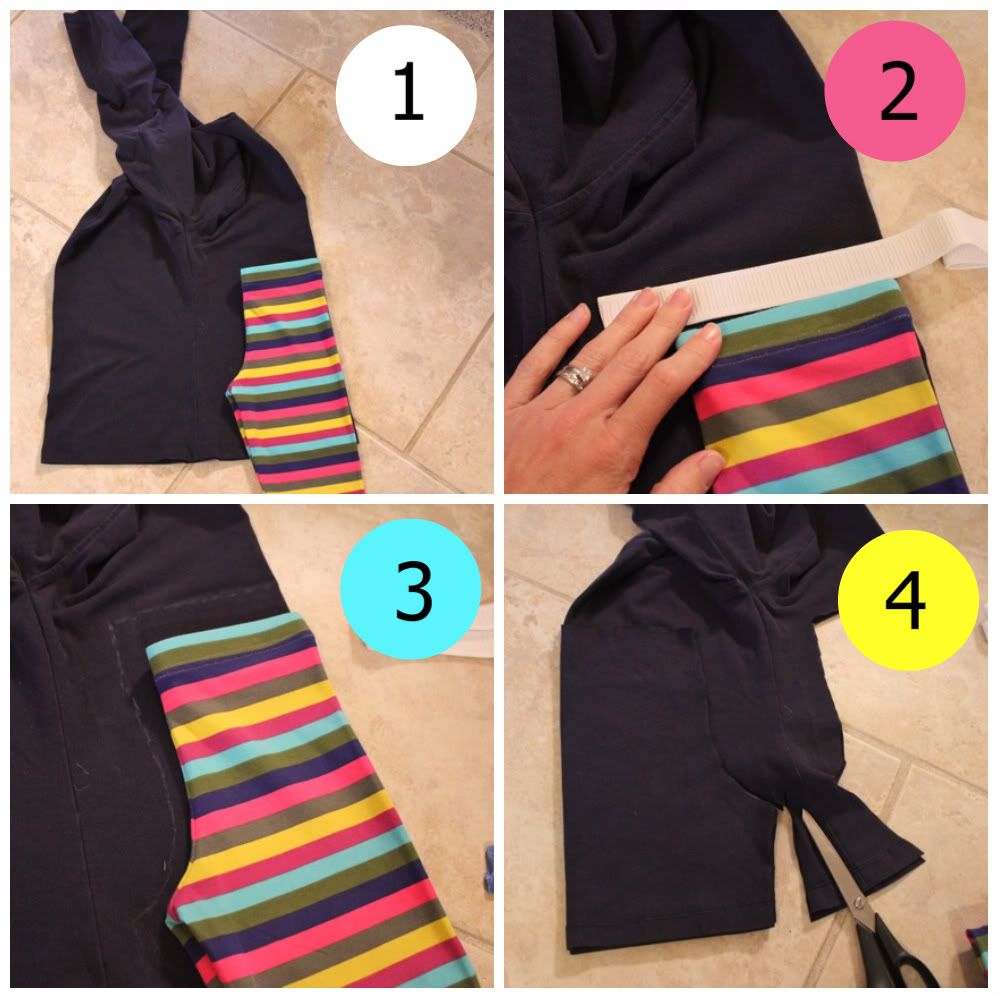
{Tutorial}:: For the *Love of Monkey Bars* Shorts

1.  Fold shirt so the side seams are on top of each other.  (See the sleeves up?)  Place the folded leggings (or your pattern) along the shirt fold and the hem of the shirt lining up with the desired shorts length.  2.  Allow room for your elastic.  3.  Mark/chalk the outline.  Remember to add seam allowance.  I used 1/2 inch.  4.  Flip the leggings over and do the same along the other fold.  Cut them out.  

5.  Pin two pieces right sides together.  Sew the pinned seams.  6.  Open up and pin the crotch/inseam together.  7.  The twin needle worked perfectly!  8.  Fold and pin casing for the elastic waist.  Sew and leave an opening for the elastic.  Feed elastic in, sew up...Done!
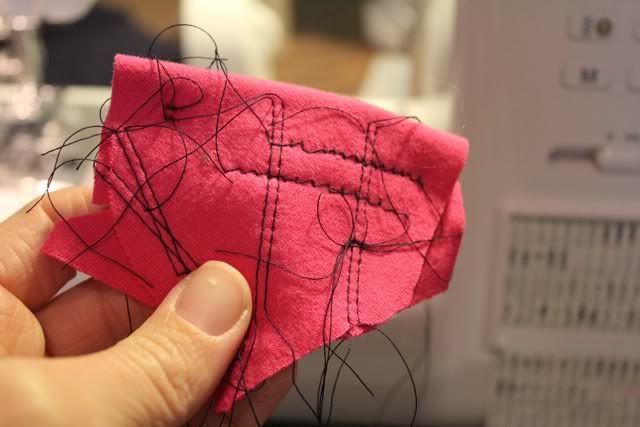

I found this Twin Needle Tutorial from Ashley at Make It and Love It and followed her directions.  But...I don't have the same sewing machine as her sooooo.....This is what happened when I didn't read the manual for my machine for using a twin needle.  Eeek! 
Apparently, it required more than just swapping the needle out and adding a spool of thread.  But after reading the directions it worked perfectly!   
I highly recommend reading your manual if you have never used your twin needle before.  

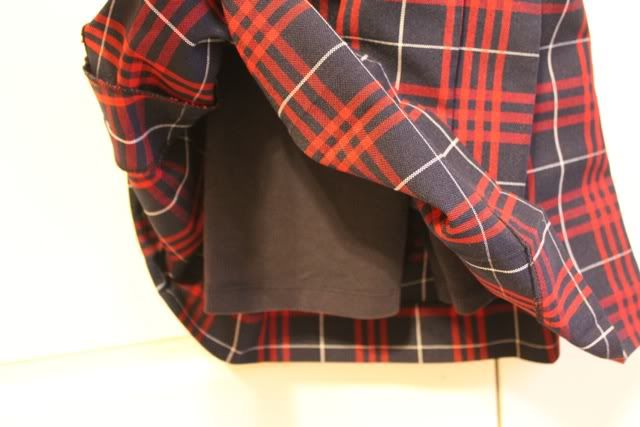
These "under shorts" or "bike shorts" can run $10-15!  And they are, pretty much necessary.  Mine cost $0.  I love $0.  


I suppose if Stella loved swinging as much as the monkey bars, I would have called these the "for the love of swings shorts".  But not the case.  She has only opted to wear shorts one time all school year!  I bet she is a sight to see- climbing and swinging and being all wild-animal-like in.her.dresses.  
Linking Here:
BWS tips buttoncraft MakingThe Girl Creative Keeping It Simple
NightOwlCraftingPhotobucketTodays Creative BlogTip Junkie handmade projects

Monday, October 10, 2011

{Recipe} Fudgy Pumpkin Brownies (made with 2 ingredients!)


I wanted to call everyone I know today to tell them about these brownies!  

Because I made them with 2 ingredients.  Only.  Nothing else.  

I did not come up with this recipe.  My sister told me about it this summer.  And she got it from her co-worker.  It sounded too easy.  I just could not imagine how it would turn out.  How would it taste?!

Brownie mix + Canned Pumpkin = awesome fudgy brownies


I promise.

Just dump them in and mix.

I used a 13x9 pan and baked it at 350 degrees for 30 minutes.

(If you want thicker brownies, use a smaller pan and adjust time/temp.)


Ok, I will tell you, they are not cakey brownies at all.  They are a very chewy, soft, fudge-like consistency.  You know when you try to turn your recipes to fat free with applesauce and splenda??  OK.  Well not quite as weird-rubbery-chewy as those.  Think like brownie fudge- but less fat and calories and more fiber!


Pumpkin Brownie Love!!!!

Linking Here:
PhotobucketTodays Creative BlogTip Junkie handmade projects


Share this

LinkWithin

Related Posts Plugin for WordPress, Blogger...