
I will discuss how to make four variations of this apron. They vary in the areas of: time to complete, supplies needed, or appearance of end result. You choose yours depending on your constraints. Today, I am posting the tutorial for #1 and #2 below.
Here is my layout for inspiration:


Tutorial: Apron #1
"Sideways Towel and Ribbon"
Level: Easy
Time: 30 min or less
You need one towel and 7 ft of ribbon. I prefer to use grosgrain ribbon; wanted a wide sash so used 1 3/8" wide ribbon.
Level: Easy
Time: 30 min or less
You need one towel and 7 ft of ribbon. I prefer to use grosgrain ribbon; wanted a wide sash so used 1 3/8" wide ribbon.
Other supplies: scissors, sewing machine, matching thread, pins, fray-check
Step 1: Lay your towel out sideways, long side at the top. Find and mark the center point of your towel. Next, find and mark the center point of your ribbon.
Step 1: Lay your towel out sideways, long side at the top. Find and mark the center point of your towel. Next, find and mark the center point of your ribbon.

Step 2: Lay the ribbon across the top of the towel matching up the center points.

Pin together, aligning the top edge of the ribbon with the top long edge of the towel.

Step 3: Sew in place. Do this by sewing along both edges of the ribbon. Backtack at ends.

Step 4: Apply fray check product to the cut ends of the ribbon. Diagonal if you like.

Now cut the ribbon ends through the liquid.

Hang to dry. Clean up your scissors. Done.
----------------------------------------------------------------------

Tutorial: Apron #2
"Gathered Sideways Towel and Fabric Sash"
Level: Easy
Time: 1 hour or less
This apron adds some gathering to make it cute and has a fabric sash which the towel will be sewn into.
You need one towel and 1/2 yard of fabric (pre-washed and ironed).
Other supplies: scissors, sewing machine, matching thread, pins
Step 1: Cut fabric for sash.
Level: Easy
Time: 1 hour or less
This apron adds some gathering to make it cute and has a fabric sash which the towel will be sewn into.
You need one towel and 1/2 yard of fabric (pre-washed and ironed).
Other supplies: scissors, sewing machine, matching thread, pins
Step 1: Cut fabric for sash.
Lay out your fabric like picture below and cut two strips that are 8" wide.

Step 2: Take one of these strips and cut it in half. Now you have three pieces of fabric- one long and two short.

Step 3: Pin the fabric pieces together, right sides together, in this order: short, long, short. This ensures that the front of your apron does not have a seam. It's a preference thing, really. Sew together where your pins are. You now have this.

Step 4: Folding and ironing.
Press your seams out if you like. Now starting at one end, fold the fabric sash in half, wrong sides together. You are folding long side to long side. Press the fold well.
Next, open up your fold and press the long raw edges to that center fold you just made. Again wrong sides together. Looks like giant bias tape!

Now fold in half along the first fold. Press.
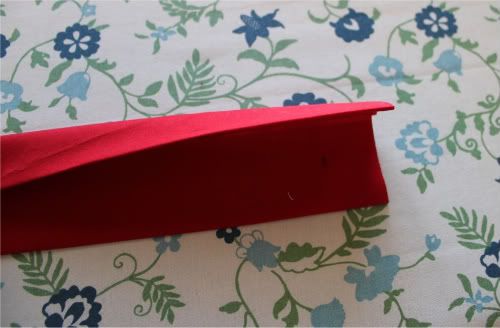

Do this for the entire length of the fabric. You can do each fold along the length (88 or so inches) one at a time- folding and pressing the whole length. Or, I did the whole process, one section at a time. Whatever you are most comfortable with. I thought I saved time by not shifting and moving the fabric as much.
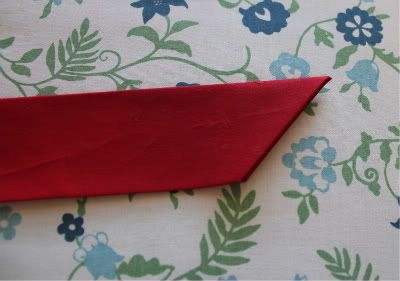
Now go back to the ends. Open up fabric, one unfold. Then fold and press the ends to look like this:

Fold back in half and press. Do for both ends. This will create a nice diagonal on the ends of your sash.
Now set this aside.

Now set this aside.
Step 5: Gather the towel.
Turn your towel sideways and choose the top of your apron. You are going to gather the top of the apron slightly to give it a cute-factor. If you already know how to do this, do so and move on to step 6. Otherwise, I will explain gathering.
You are going to sew a long stitch across the top of your apron and pull the bobbin threads until it is gathered to your liking. Easy. Set your machine to its longest stitch length, mine is 6. Before you place your fabric on your machine, grab your threads and pull some extra thread out to the back of your sewing machine. This will give you something to hold onto in a minute. Stitch along the top edge and when you come to the end, pull your threads a few inches extra before cutting away. Now take a bobbin thread (bottom thread) on one end and hold it while sliding the fabric closer together. Gather from both sides and hold it up to you to get the right amount of scrunch. Doesn't take much on this project. Ok? Next.
Step 6: Mark the center of your towel and the center of your fabric sash. Match up the center points and place the towel inside the folded fabric. Get the towel all the way up into that center fold. Pin in place.


Step 7: Sew.
You are going to want to start sewing on one of the diagonal ends and just continue along the top of the sash, then along the top edge of the apron (where your towel is inserted). Continue sewing out along the sash on the other side of the apron, down the diagonal end, and back across the entire sash, sewing the towel into place in the process. One continuous mile-long stitch. Backtack. Done.

Cuuuute, huh?! Now put it on and whip up some cookies! Ha! OK...I will come back tomorrow with #3 and #4.
Was that too difficult? If so, leave me a comment and I will walk you through your trouble.
Very cute! Simple yet stylish! Thanks for sharing!
ReplyDeleteVery cute idea and such cute towel fabric. Thanks for sharing your great tutorial!
ReplyDeleteThese are awesome! Thanks for the tutorial! I found you through Made By You Mondays and am now a follower.
ReplyDeleteMelanie
youmadethat.blogspot.com
This is such a cute idea and a perfect hostess gift or last minute gift. Better go and stock up
ReplyDeleteThanks for sharing.
@Lynn, Shannon, Melanie, and Marianne,
ReplyDeleteThanks so much for your encouragement! And for finding me! You can see I am very new to this!
@ Marianne... and I never thought as a hostess gift! Sometimes I never know what to bring to a dinner especially when I *know* they are going to have tons of food and wine already! This craft is that quick and easy. We could whip one up before party!!
Thanks for your idea!!
Hi.. What a great idea. These look amazing! They'd be perfect gifts for some of my baker friends! :) Thanks for sharing
ReplyDeletevery nice thanx =) =)
ReplyDeleteThe principle effectiveness of a residential look that can assist you always keep, ready yourself as well as cause portions diet regime as well as in order to perform like undertakings as with dishwashing.cub cadet zero turn hydrostatic problems
ReplyDeleteThis is a really cool post. I love this kitchen. It is completely the style that would fit me.cub cadet zero turn hydrostatic problems
ReplyDelete