

Hi again. I will just say, when I am posting a tutorial, I will most likely just get down to business and save the chit chat for another day (when I am out of tutorials and craft ideas- Ha!). So let's get to it.
Today, I am going to show you how to make towels #3 and #4. Both of these involve cutting your towel and sewing to back together for the apron front. Yesterday's tutorials were easier because we just turned the towels sideways and left it at that! The main difference between #3 and #4 is the pattern of the towels. For #3, the side panels of the apron are "upside down" (but in a stylish way). This way is quicker than making #4 where the print is all going in the same direction (also stylish, yes).

Tutorial: Apron #3
"Cut Apart Towel (upside down sides) and Ribbon"
Level: Advanced beginner
Time: 1 hr or less
You need one towel and 7 ft of ribbon. Again, using 1 3/8" wide grosgrain ribbon.
Level: Advanced beginner
Time: 1 hr or less
You need one towel and 7 ft of ribbon. Again, using 1 3/8" wide grosgrain ribbon.
Other supplies: scissors, sewing machine, matching thread, pins, fray-check
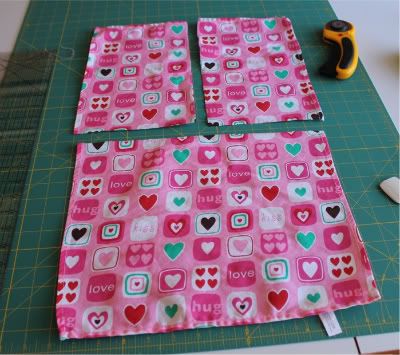
Step 1: Lay your towel out and cut in half, cutting across the width of the towel. Then cut the top piece in half along the length. Here, just look at this picture:

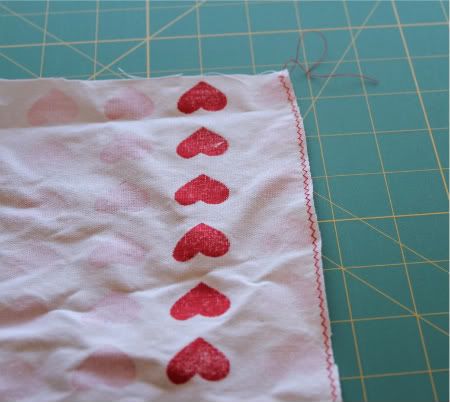
Step 2: Clean up those raw edges.
Sew a zig zag stitch along the raw edges of the two small pieces that you just cut.
Sew a zig zag stitch along the raw edges of the two small pieces that you just cut.

Step 3: Sew panels together.
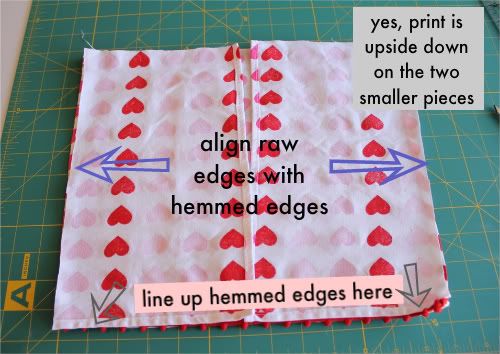
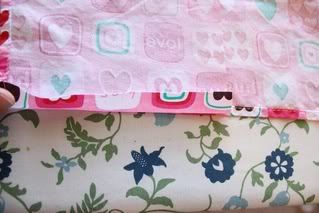
Lay the big piece of towel down, right side up. Lay the small pieces of towel on top of the big piece, right sides together and placing the finished (factory hemmed) sides of the smaller pieces in the center. **This is going to cause your print to be upside down on the smaller pieces. This is what you want to do**
Align the bottom edges- all of which are already hemmed. Now line up the raw edge of the small piece with the hemmed side of the big piece. Pin in place, if you like. Yes, confusing to explain, so look here:
Now sew the small towel panels to the big piece along those pinned edges. Open up the apron panel and iron the whole thing out flat.
Step 4: Hide that raw edge on the top.
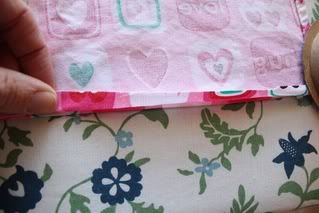
Since we cut this towel it has a messy raw edge along the top. We need to fix that before attaching the ribbon. Start by folding the top over 1/4 inch to the back of the towel. Then fold again, another 1/4 inch. Now the raw edge is hidden in your fold. This is also a good time to even out the apron panel if it is a bit crooked from being a cheap towel : )
Lay the big piece of towel down, right side up. Lay the small pieces of towel on top of the big piece, right sides together and placing the finished (factory hemmed) sides of the smaller pieces in the center. **This is going to cause your print to be upside down on the smaller pieces. This is what you want to do**
Align the bottom edges- all of which are already hemmed. Now line up the raw edge of the small piece with the hemmed side of the big piece. Pin in place, if you like. Yes, confusing to explain, so look here:

Now sew the small towel panels to the big piece along those pinned edges. Open up the apron panel and iron the whole thing out flat.
Step 4: Hide that raw edge on the top.
Since we cut this towel it has a messy raw edge along the top. We need to fix that before attaching the ribbon. Start by folding the top over 1/4 inch to the back of the towel. Then fold again, another 1/4 inch. Now the raw edge is hidden in your fold. This is also a good time to even out the apron panel if it is a bit crooked from being a cheap towel : )

Step 5: Attach the sash.
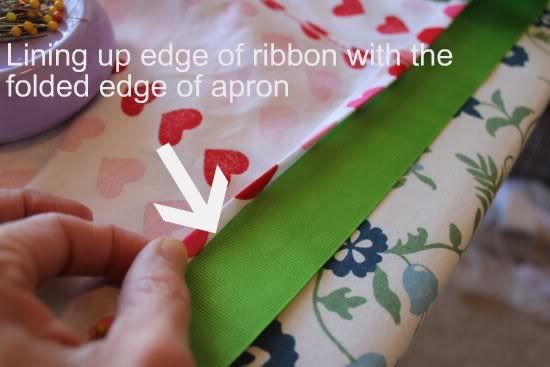
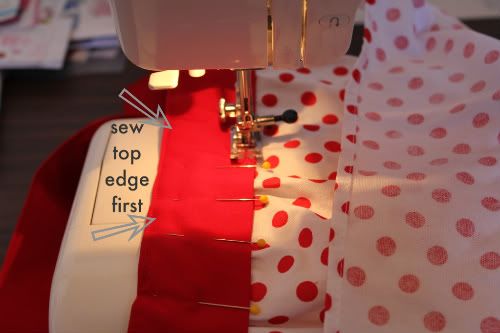
We are using ribbon here so we'll use the same technique in yesterday's post (Apron #1). Basically, find the center of the ribbon and the center of the apron front.
Match up center points-- ribbon is face down and the apron panel is on top of the ribbon, also face down. You want the bottom edge of the ribbon to to be aligned wtih the folded edge of the towel. In Apron #1, we lined up the towel on the top edge of the ribbon. Probably don't want to here because your apron panel is already shorter than the panel in #1...don't want to lose another 1 3/8"...or maybe your towel is bigger than mine.

Pin ribbon in place.

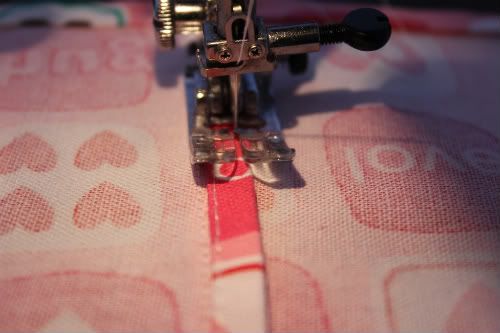
At last, sew the ribbon to the towel. I believe that when I did this I sewed from the back to make sure I caught both layers.
Finish the ends of your ribbon using the fray check. Yesterday I showed you how to do this for Apron #1
-------------------------------------------------------------------

Tutorial: Apron #3
"Cut Apart Towel (right sides up) and Fabric Sash"
Level: Advanced beginner
Time: 1 hr or less
You need one towel and 1/2 yard of fabric (all prewashed and ironed).
Other supplies: scissors, sewing machine, matching thread, pins, seam ripper
Step 1: Make the sash. Follow my tutorial for Apron #2, Steps 1-5. I hate to ask you to do this, but if I don't my post will be foolishly long. But the pictures are great and everything is explained.
Step 2: Lay your towel out and cut in half, cutting across the width of the towel. Then cut the top piece in half along the length. Here, just look at this picture:
From the picture above, slide the small pieces down and next to the large piece- big piece in the center and a small piece on either side. The small pieces will have their raw cut side edge positioned next to the big piece and their factory sewn edges on the outsides of the layout. Now you see that the bottom edges are raw edges on the small pieces. We will unpick the factory sewn seams along the tops of the short pieces to fix this.
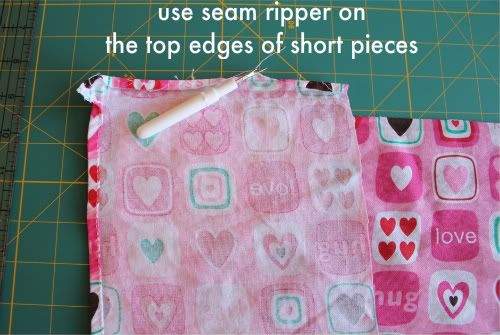
Step 3: Use your seam ripper ( I can hear you cursing me now :) ) to undo the stitching in the top ends of your smaller towel pieces. Now press flat.
Step 4: Now place the small pieces face down on top of the larger piece- right sides are together. All prints going in the same direction. If you lay it out as you did in Step 1 after you cut, then think of closing the shutters (small pieces) on top of the big center piece. Align the top raw edge or the big piece with the raw edges you just seam ripped (like how I use "seam rip" as a verb?) Should look like this:
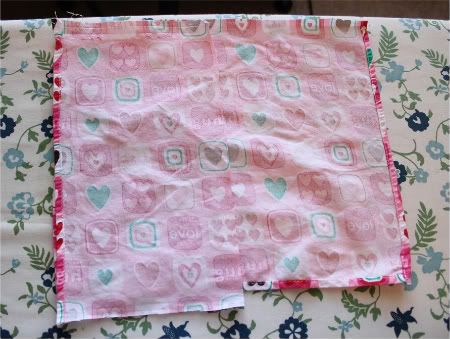
With the tops lined up, the bottom edges are not. Perfect. We will hem the short pieces.
Step 5: Hem short pieces.
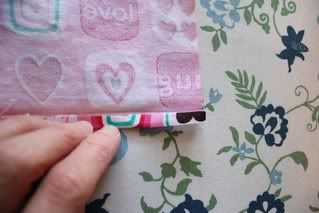
First fold the raw edge of one short piece up and towards the back of the fabric so that the fold is aligned with the factory sewn hem on that big towel piece. Iron down fold.
Then fold the raw edge under again; raw edge to the fold line. Iron this down well.
Now your raw edges should be encased in this folded hem. Pin hem and sew down the fold. Do the same for the other small towel piece.
Step 6: Sew the three towel pieces together to make apron front.
Position the small pieces on the big towel piece making sure the bottom hems are even. Pin sides together.
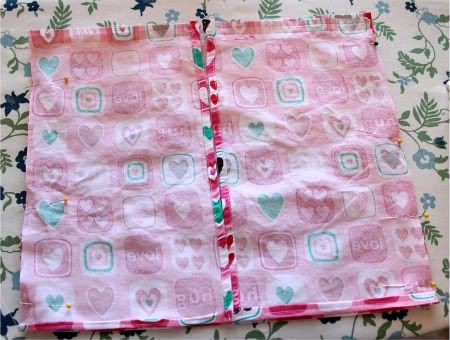
Sew the two seams to get one big happy apron front!
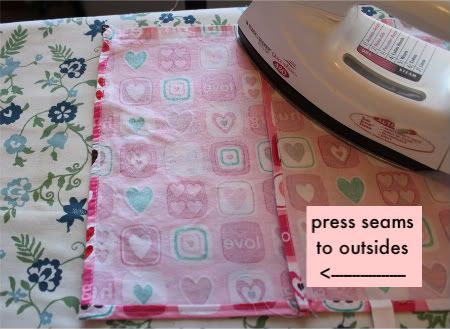
Step 7: Pretty up those seams you just made.
Sorry, I had to add these extra steps in to give the apron a nice finished look. Turn your apron front over, right side down, on your ironing board. Press both seams to the outsides.
Sew these seams down. Do this by sewing, from the back, right into that factory sewn edge. This is not going to be fun because it is so thick, but this encases the raw edge and looks professional. Do the same for other seam.
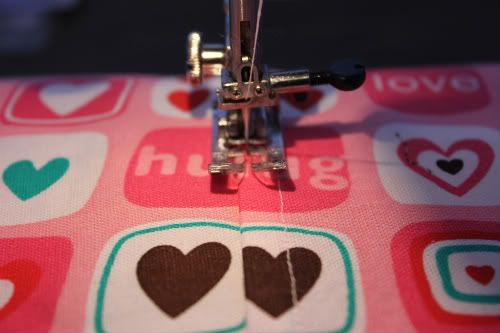
Now turn the apron panel over and make another stitch on the front side down those seams. This is partly to secure the seam and keep it from buckling and partly because I thought a double seam made it look nice!

From the picture above, slide the small pieces down and next to the large piece- big piece in the center and a small piece on either side. The small pieces will have their raw cut side edge positioned next to the big piece and their factory sewn edges on the outsides of the layout. Now you see that the bottom edges are raw edges on the small pieces. We will unpick the factory sewn seams along the tops of the short pieces to fix this.
Step 3: Use your seam ripper ( I can hear you cursing me now :) ) to undo the stitching in the top ends of your smaller towel pieces. Now press flat.

Step 4: Now place the small pieces face down on top of the larger piece- right sides are together. All prints going in the same direction. If you lay it out as you did in Step 1 after you cut, then think of closing the shutters (small pieces) on top of the big center piece. Align the top raw edge or the big piece with the raw edges you just seam ripped (like how I use "seam rip" as a verb?) Should look like this:

With the tops lined up, the bottom edges are not. Perfect. We will hem the short pieces.
Step 5: Hem short pieces.
First fold the raw edge of one short piece up and towards the back of the fabric so that the fold is aligned with the factory sewn hem on that big towel piece. Iron down fold.
 |  |
Then fold the raw edge under again; raw edge to the fold line. Iron this down well.

Now your raw edges should be encased in this folded hem. Pin hem and sew down the fold. Do the same for the other small towel piece.
Step 6: Sew the three towel pieces together to make apron front.
Position the small pieces on the big towel piece making sure the bottom hems are even. Pin sides together.

Sew the two seams to get one big happy apron front!
Step 7: Pretty up those seams you just made.
Sorry, I had to add these extra steps in to give the apron a nice finished look. Turn your apron front over, right side down, on your ironing board. Press both seams to the outsides.

Sew these seams down. Do this by sewing, from the back, right into that factory sewn edge. This is not going to be fun because it is so thick, but this encases the raw edge and looks professional. Do the same for other seam.

Now turn the apron panel over and make another stitch on the front side down those seams. This is partly to secure the seam and keep it from buckling and partly because I thought a double seam made it look nice!

Step 8: Mark the center of your towel and the center of your fabric sash. Match up the center points and place the towel inside the folded fabric. Get the towel all the way up into that center fold. Pin in place.

Step 9: Sew.
You are going to want to start sewing on one of the diagonal ends and just continue along the top of the sash, then along the top edge of the apron (where your towel is inserted). Continue sewing out along the sash on the other side of the apron, down the diagonal end, and back across the entire sash, sewing the towel into place in the process. One continuous mile-long stitch. Backtack. Done.
And yes, I know this picture is of Apron #2 : )

Whew! That was a looooong post. But it is there. Published. For referral purposes only, too. Dry and boring, but informative. Enjoy the tutorials and now you can choose which apron you want to make!
How easy! What a great idea! After I take the bar, I am going to try and make one. And I love how you used a towel as the material. All I do with my aprons is wipe my hands on them, so the towel is perfect!
ReplyDeletevery cute, great tut. new follower..hope you can follow back:)
ReplyDeletehttp://jaysonandashley.blogspot.com