

My daughter is a "skirt girl" through and through! But she is always doing non-skirt activities. Like being upside down, for instance. Leggings will work now, when it is cooler out. We all know though, that "cooler" weather doesn't last long here in Oklahoma and in just weeks it will be permanent shorts, or for Stella, skorts weather!

NOW MAKE THE SKIRT

6. Optional: Turn inside out. BUT I want to use the inside of the shirt as my skirt to hide the logo design. So I am leaving mine Right Side Out.
13. Fold elastic down over shorts and in the same way in step 11, stretch and sew.

Yes, I know, skirts are just so dang easy to make! I suppose I could always make her wear shorts under them. OR I could just sew in shorts and not have to worry about her flashing her panties everywhere.
{Tutorial} The 2 T-shirt SKORT
You need:
2 T-shirts and elastic for the waistband
AND as a template, a skirt and pair of leggings that currently fit

START WITH THE SHORTS


START WITH THE SHORTS

1. Lay folded leggings on side fold of shirt. Position so you have enough but not too much in seam. I used 2 1/4” - 2 1/2” inseam (approx size 4/5). The hem of the shirt will be the hem of the shorts! Trace leggings on the shirt and add a seam allowance.
2. Cut 2 of these
3. Sew short edges together on each piece, right sides together. These = legs
4. Turn one leg right side out and slip inside the other leg. Align inseams. Pin. Sew inseam in one go. Turn right side out.
2. Cut 2 of these
3. Sew short edges together on each piece, right sides together. These = legs
4. Turn one leg right side out and slip inside the other leg. Align inseams. Pin. Sew inseam in one go. Turn right side out.
NOW MAKE THE SKIRT
- Lay out skirt on top of T-shirt; align the bottoms
- Add for elastic and seam allowance (I added 3/4” for elastic + 1/2”)
- Cut shirt straight across. The wider the shirt, the fuller the skirt.

6. Optional: Turn inside out. BUT I want to use the inside of the shirt as my skirt to hide the logo design. So I am leaving mine Right Side Out.
7. Cut elastic and sew ends together
{TIP} Mark elastic with two lines- the other end and the cut line (about 1” from end line). These two lines tell you where to overlap and sew.


8. {TIP} Sew a straight stitch as a guideline 1/2” from top edge. I used a serger here as my guideline
9. Mark quarters/quadrants/fourths on both elastic and top of skirt.

10. Pin skirt and elastic together at each quarter mark. Align top edge of elastic with your guide stitch.

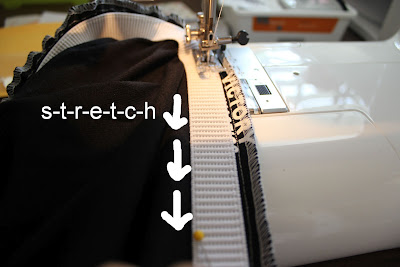
11. Sew together by stretching elastic from pin to pin. {TIP} Start with a good backtack and keep needle down between sections.
9. Mark quarters/quadrants/fourths on both elastic and top of skirt.

I marked the elastic with pen and the skirt with pins.
10. Pin skirt and elastic together at each quarter mark. Align top edge of elastic with your guide stitch.

11. Sew together by stretching elastic from pin to pin. {TIP} Start with a good backtack and keep needle down between sections.

{TIP} To keep the gathering even-ish I like to stretch out the quarter section and then move my hold to the midpoint. I then sew each quarter section in two parts. Stretch elastic with one hand and pull through the machine with the other.
12. Mark the top of the shorts at the quadrants (2 seams & 2 sides). Align the quad-marks of the shorts with the quad marks of the elastic. Pin at the 4 quad-points.

12. Mark the top of the shorts at the quadrants (2 seams & 2 sides). Align the quad-marks of the shorts with the quad marks of the elastic. Pin at the 4 quad-points.

I did switch my thread at this point to match the skirt. Probably should have done that from the start, yes.
13. Fold elastic down over shorts and in the same way in step 11, stretch and sew.


14. Add a tag or slip a piece of ribbon in as you finish sewing the waistband to help your kids know the back of the skort. I used a printed ribbon as a tag this time.

Ta-Da!


super cute! I'll definitely have to try this for my niece. Such a wonderful idea!
ReplyDeletePoooooooooooooooooooolooooooooooooooooooooooooooooooooooooooooooooooooooooooooooooooooooooooooooooooooooooooooooooooooooooooooooooooooooooooooooooooopy
ReplyDeleteThank you so much for this skort tutorial. I had been trying to find an inexpensive one to buy...but this definitely beats price-wise! Thanks again!
ReplyDeleteNice one.
ReplyDeleteT Shirts for Men | Attitude | Mens T Shirts | Attitude.com