
It is a pretty odd handy-woman skill that I know but wanted to share with you because I have done this one a bunch of times and feel pretty confident about it.
First, please trust me when I say, toilets are not complicated. Gross, yes, so I always give mine a good cleaning before I have to get this personal with it.
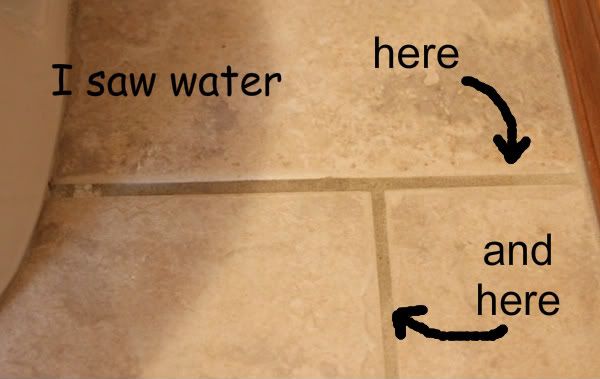
Problem: A few weeks ago, I noticed the grout was darker around my toilet. I cleaned it. My first thought was that the boys were going and missing in my bathroom. But that wasn't the case. I knew it was the other problem- water under my toilet. And the answer was most likely, and most cheaply, a new wax ring. This repair is going to cost somewhere between $1-$6.
{Handy-woman} Solution: Replace Wax Ring on Toilet


At this point, I call for my helper- who was folding laundry. That's right. My husband did the laundry while I fixed the toilet. We laugh pretty good about that! Just like on Saturday, I fixed the gutters and he watched the kids.
OK back to business...

Now we will replace the wax ring. Funny, my husband bought it, but I did the whole repair. He chooses the jumbo size because in our first house we needed that one due to the floor being uneven under the toilet. Back then, we used two regulars stacked together. However, in this house we really don't need the jumbo. It just means more squishing on (see below).

11. TEST your work:
a. reconnect waterline to the tank and fill the tank about half way.
b. flush and look around the bottom
c. let the tank fill completely and flush again. and again. and maybe once more for good measure.
d. if you don't see water on your floor, you are in good shape! If you do, I am so sorry, but you are going to have to turn off the water and start over. You may or may not need a new ring.
12. Tighten your toilet bolts- do not over tighten! Do a couple turns on the right then a couple on the left, alternating until it is tightened.
13. Recaulk when floor is dry...I like to wait a few days before I recaulk. Just to be sure! Again, speaking from experience.
And yes, I am linking up a post about toilets to these fabulous parties:


First, please trust me when I say, toilets are not complicated. Gross, yes, so I always give mine a good cleaning before I have to get this personal with it.
Problem: A few weeks ago, I noticed the grout was darker around my toilet. I cleaned it. My first thought was that the boys were going and missing in my bathroom. But that wasn't the case. I knew it was the other problem- water under my toilet. And the answer was most likely, and most cheaply, a new wax ring. This repair is going to cost somewhere between $1-$6.
{Handy-woman} Solution: Replace Wax Ring on Toilet
1. If your toilet is caulked around the bottom (and it probably is) remove all the caulk. I just scrape it off with a metal putty knife. 2. Turn off water at the wall.
3. Flush toilet until won't flush anymore. 4. Remove water from tank and bowl. I use a cup to scoop out the water. When that isn't efficient anymore, I use a towel or sponge to soak up the water and wring it into a bucket. 5. Now detach water line from tank. I had a bit of a problem with the waterline this time. Even though I felt like it was turned all the way off, water was still dripping out. I used a cup and towels to catch the water vs. tightening it more. I am just overcautious after breaking one of those before (different house). 6. Remove the nuts from the toilet bolts. They are under those white caps, which just pop off. **If the bolts look rusted out you will need to replace them as well. You can buy the repair kit that includes the bolts or get them separately. Only problem with the bolts is that sometimes they are too long and will need cut.
Before you move on, you are going to need some wadded up newspaper, a spot to put your toilet (against a wall works well), and probably a helper. A toilet is pretty heavy and you don't want to put any pressure on the back tank! Lift from the bowl so the tank doesn't crack. Remember to handle the toilet carefully in the next steps so you don't crack any porcelain.
At this point, I call for my helper- who was folding laundry. That's right. My husband did the laundry while I fixed the toilet. We laugh pretty good about that! Just like on Saturday, I fixed the gutters and he watched the kids.
OK back to business...
7. Give your toilet a side-to-side jiggle to make sure it is loose and lift it STRAIGHT UP over the bolts.
Now stuff some paper in that hole! Keeps gross air out. **Remind yourself to REMOVE that paper before you put the toilet back!
Now we will replace the wax ring. Funny, my husband bought it, but I did the whole repair. He chooses the jumbo size because in our first house we needed that one due to the floor being uneven under the toilet. Back then, we used two regulars stacked together. However, in this house we really don't need the jumbo. It just means more squishing on (see below).
8. Remove the old wax ring. I use the putty knife. Sometimes the ring might be on your floor but usually it is stuck under the toilet- where it should be.
9. Take the new wax ring and squish it right on the bottom of the toilet. Center on the hole as much as possible. (There is also the "cheater way" where you put the ring over the hole and squish the toilet on.)
10. Put the toilet back where it goes. **Remove that paper!** CAREFULLY align directly over the bolts and press down super slowly and very evenly. Stand over the toilet and press straight down to squish the wax.
Test it first. TRUST ME. I have done this repair before only to have water seeping out from the bottom on the first flush! 11. TEST your work:
a. reconnect waterline to the tank and fill the tank about half way.
b. flush and look around the bottom
c. let the tank fill completely and flush again. and again. and maybe once more for good measure.
d. if you don't see water on your floor, you are in good shape! If you do, I am so sorry, but you are going to have to turn off the water and start over. You may or may not need a new ring.
12. Tighten your toilet bolts- do not over tighten! Do a couple turns on the right then a couple on the left, alternating until it is tightened.
13. Recaulk when floor is dry...I like to wait a few days before I recaulk. Just to be sure! Again, speaking from experience.
And yes, I am linking up a post about toilets to these fabulous parties:
Great tutorial -- and you never know when this information will come in handy! I would love it if you would consider linking to Busy Monday at A Pinch of Joy, a Sunday through Thursday link party for ideas that make life easier, better and more fun!
ReplyDeleteYou know I laughed out loud at the visual of you in your rubber gloves disassembling the toilet and Shawn doing the laundry. Not that either is funny in itself. It is just so you two. :)
ReplyDeleteOH YES, it IS funny! You like those purple gloves? Shawn bought them for me...so thoughtful that he chose purple! HA! We joke that our neighbors probably think he is a poor excuse for a husband because they will always see me outside with the saw or on the ladder. Oh my- the day I bought the circular saw, those men checked on my like three times! I am the one who goes across the street and borrows tools! It is REALLY funny. But it's a good team and somebody has to watch the kids! : ) Now I am laughing! : )
DeleteI am EXTREMELY impressed! Toliets scare the heck out of me. Newest linky follower ( -:
ReplyDeleteMalia
www.yesterdaytontuesday.com
I don't agree at all on replacing the wax ring. A toilet can leak at the 1)supply line 2) tank to bowl bolts 3)tank to bowl seal 4)Vanity sink could be leaking over to toilet. 5) Tub could be leaking to the toilet at tub faucets . 6) Laundry connections "other side of the wall" could be leaking.7) could be spraying up through the toilet lid. 8) could be leaking down the side of the tub when bathing or showering.
ReplyDeleteWHAT. A. WOMAN!
ReplyDeleteWOW, you go, Kate! It feels good to have fixed something around the house, right? I mean, knowing that you’ve worked on something gives you some sort of assurance that it’s going to last. I’ve removed a toilet before, and for me, the messiest part is the old wax ring underneath the bowl. By the way, if you have a slow silent leak in the house, you can trace the leak by putting food coloring in the water tank. See to it that it makes its way to the toilet bowl. If it does, the toilet isn't staying sealed like it should be.
ReplyDeleteNice one, Kate! I was kinda shocked when I read that you’re the one doing the repairs in the toilet, while your was husband folding your laundry. I know few people in a situation like yours, and they’re enjoying this kind of set-up. This DIY repair could help me a lot, since my husband works far and I’m the one in-charge of the house. When damage occurs, I guess I can also follow your plumbing pointers. :)
ReplyDelete[ Carmella Vancil ]
Great post, Kate! It really feels great that you're able to fix things on your own. You won't have to call the attention of a plumber just for the sake of a little fixing. However, there are things on plumbing that really needs an expert, like replacing a pipe or checking more complicated problems.
ReplyDeleteLevi @CapitalPlumbing.ca
I don’t suppose many of websites give this kind of information.
ReplyDeletePlumbing
Oh! That's great Good Information ...
ReplyDeleteGenerally as I would do the job but I would not waste my time putting ptfe tape around the threads of the connecting joint. this has no bearing on making the joint watertight.. Wrapping tape around the face of the olive (contact side as you insert into valve base) will give a better result. Usually a cut up milk carton is too rigid to work well, I find that a heavy duty plastic sack (merchant's sand or gravel bag is more suitable if nothing else to hand.
ReplyDeleteKirkland Plumbing
There is nothing more in the world that I hate then dealing with the toilet, clogs, and anything bathroom related. LOL my wife and I actually considered getting me hynotised because of how bad my gag reflex is when I even have the though of cleaning a toilet, etc. I just called a plumbing company to take care of any broken issues instead.
ReplyDeleteThis is the first time i read your blog and admire that you have posted on this..Keep sharing.. toilet repair los angeles
ReplyDeleteThis comment has been removed by the author.
ReplyDeleteGood tips for a diy scenario. Thanks for sharing
ReplyDeleteThis is very good piece of information. Thank you for sharing this one with us
ReplyDeleteIt's helpful! Thank you!
ReplyDeleteI really enjoy simply reading all of your weblogs. Simply wanted to inform you that you have people like me who appreciate your work. Definitely a great post. TO find top account on tiktok, please visit site tiktok viewer
ReplyDeletehttp://craftwhatever.blogspot.com/2012/05/balance-on-my-brain-oh-and-where-i-have.html
ReplyDeletehttp://creatingamongstboys.blogspot.com/2013/04/new-workout-routine.html
http://claremontavenue.blogspot.com/2011/06/oh-hello-there.html
http://craftyandcookingmomma.blogspot.com/2013/09/special-mushroom-fried-rice-recipe.html
https://www.thecreativemom.com/shiplap-wreath-display-farmhouse-desk/
http://creatingafamilyhome.blogspot.com/2014/09/yesterday-kite-joy.html
http://vivianluna.blogspot.com/2013/12/dog-treats.html
http://creating-sarah.blogspot.com/2014/07/moments-little-boys.html
http://craftersadd.blogspot.com/2011/01/adorable-magnetic-calendars.html
http://cookienut.blogspot.com/2014/01/signed-copy-giveaway.html
This is a great and interesting post with a with a nice layout blog, i believe every reader will find this information very useful. thanks for sharing, also checkout this bun post utme past questions for medicine
ReplyDeleteI would not spend my time by wrapping PTFE tape over the threads of the connecting joint. This will not affect the joint's ability to be waterproof in any way. A better outcome can be achieved by wrapping tape over the face of the olive (the side that makes contact with the valve base as it is inserted). If you don't have anything else available, a heavy-duty plastic sack (merchant's sand or gravel bag) is preferable than a milk carton that has been torn up since it is less likely to be too stiff to operate effectively. check is ndu post utme form still on sale
ReplyDelete