Monday, February 27, 2012

A busy week for me and Chicken Tips

I really really really don't like to use my blog as a platform to complain (that's why I am hardly ever on facebook).  And I really don't want to complain.  More like, explain why I am not posting everyday right now.  Which, I know, is a ridiculous expectation that I put on myself.  I get that.  And I don't like how it feels to be under (my own) pressure to crank out an awesome tutorial or awesome post  SO I am just not going to put that pressure on myself.  At least at the moment.  I have too much going on at home- with my kids and family- that require my attention.  In fact as I type this I am being badgered by my husband to review some movies that our daughter has been watching in school and says "scare" her.  This is important.  My Stella's birthday is this week, also important.  My sleep is important.  Showing you the adorable shoes that Stella and I glittered up this weekend- well, important but it can wait.  Yes?  Today, I had great plans to go shopping for birthday presents but my oldest son needed to come home from school sick just as I was halfway to the store.  Big wrench in my plans.  So I had to go tonight, flying out the door after dinner.  Not ideal.

What I did get done today was some cleaning and I cut up about 10 lbs of chicken!  I hate cutting up chicken.  It is disgusting to me.  But it is a huge time saver and money saver so I have to do it.

It took only took about 30 minutes to cut up all this chicken.  (plus about 5 min to set up and 5-10 to label bags and clean/disinfect everything).  I put about 3 pieces of chicken in a bag.  Today I got 7 bags/meals from the 10 pounds- just depends on what I plan to make.  Here's my tutorial on chicken.

 In about 30 minutes...it all looks like this!


I flatten out the bags so they defrost quicker and stack nicely in the freezer.  Ten pounds...cleaned and trimmed...cut into different size pieces...easy to pull out of the freezer...ready to cook in the coming weeks.

Friday, February 24, 2012

Spray Painted Girls Shoes

Pin It
I knew I had an opportunity to try spray painting shoes when my daughter's school shoes came home looking like this.
I mean, they were now pretty ugly.  And I couldn't just "sharpie" them like I did to her black shoes.  It's too bad, too because these were her favorites.

Until NOW!

Now THESE are her favorites!

And mine, too.  I really think mama needs a pair just like this!

All I did was tape off the soles and stuff a bag inside.  I also had to tape off the velcro and the underside of the foot strap.
To be honest, I wasn't sure how to deal with all of the peeling vinyl.  I thought it would show so I wanted to peel it off a bit of the edges.  One shoe did fine with this.  But when I started to peel the second shoe...the whole thing came up!  I was freaking out at this point.  But really, it was too late to turn back now.  So I just peeled until I thought it wouldn't be that noticeable.

I used a plastic primer spray paint (because I already had it) on the unpeeled shoe.  I am not sure if it was beneficial or necessary though.  And I definitely needed two coats of the blue on both shoes.  The peeled shoe soaked up a lot of the paint after the first coat and I didn't think they were going to match in finish.  But after everything had dried, they seemed to match just fine!  I was so excited about how these turned out!  My daughter was too!


** I actually think the shoe that had the vinyl peeled off had a better result.  These shoes have been worn around the house for two days now and so they already have some minor scuffing on the blue paint.  But the peeled part was not scuffed at all.  It was a pain on my fingers to peel the shoe, but for this type of surface (fake patent leather) it seemed to be worth it.

I still have blue paint left...I am really wanting blue shoes, too.
Pin It

Linking here:


Wednesday, February 22, 2012

{Pinned It, Did It} A Baby Bib

Oh I have had this one pinned for quite a while, just *waiting* for someone to have a baby girl so I could make it!  Then it still took me a couple more months to actually make it, wrap it, send it...OH and ask my friend to send me pictures because I forgot to take them myself!

And...Isn't she a cutie?!
In case you are wondering- this is my friend's baby!  You can already tell by those fingers how adorable she is!!!!!  The bib is still a little big, but she is only going to grow, right?  The back of it was made with a soft pink flannel.  I found both fabrics at Hobby Lobby.

Here is the original post by Jess at Craftiness Is Not Optional.  
She has a free pattern, too.
Source:  Craftiness Is Not Optional
-------------------------------------------------------------------------------------------

And, I just can't resist the chance to gush about one of my favorite blogs, too:  Craftiness is Not Optional

If you think this is cute, you need to stop by her blog.  Jess is very, very talented at sewing!  Her little girl dresses make me wish that I was a size 2T so I could fit into them!  I love every single thing that girl makes!

All I can say, is do NOT be surprised if you find me in a shirt like this one day!
I will find a way to supersize it to fit me.
Source:  Craftiness Is Not Optional


Pin It

Thursday, February 16, 2012

Sad Mac and happy Friday

You know when you spend all day baking all kinds of yummy cookies and then you really don't eat any because you filled up on so much dough??

Well I am kinda feeling like that tonight with my computer.

I have been working on it all afternoon and evening trying to fix a few "issues" and I just can't look at another photo on my computer tonight! In fact, I am blogging from my phone right now! I had a cute post about my past travels lined up but it's going to have to wait til next week. I just can't fuss anymore about my computer (or printer). Hopefully, Saturday we will work on our Mac and get these problems fixed. As for today, I am all headache about it! But I am still here. Just working behind the scenes and trying not to put my printer in the driveway and back over it a few hundred times!

Happy Friday, friends!


- Posted using BlogPress from my iPhone

no reply-comment@blogger means no reply to you, from me

Dear friends,
It always makes me sad when I get a great comment and then I click reply in my email and I see this: no-reply blogger@blogger.com


See, when you leave me a super awesome comment, blogger sends me an email to let  me know!  (awesome.)  Then I can read it right away. (awesome.)  But if your email address is not linked to your blogger profile then I can't email you back (not awesome.)

This is just an example...this is what i see:


I know that is not your email address.  It is not anyone's email address.  


Laura Beth from A Step in the Journey has put together a great tutorial on how to change this.

If you aren't sure if you're a no-reply blogger, then just please, please, please go and look at her tutorial and decide.  

I have a small blog.  And I do my very very best to reply to everyone who contacts me.  I just need your email.

Love, 
Kate

Pin It

Tuesday, February 14, 2012

Liebster Love for Valentine's Day

I have been needing to do this for a while now.  A couple of months ago, I was given this award:


by 
Sky at Capital B
and

Thank you girls SO SO much for recognizing my little blog!
Today, it is my turn to pass it along to some more great bloggers!  I couldn't think of a better day than Valentine's Day to do this.  I did receive this once before so I wanted to wait a bit before handing it out again.  

Here are the Liebster Rules:
Post the award on your blog.  The award is given to bloggers with less than 200 followers, to promote and encourage new friendships among the blog community. 

  1. Show your thanks to the blogger who gave you the award by linking back to them.
  2. Reveal your 5 picks for the award and let them know.
  3. Bask in the love from the most supportive people on the blogsphere... other bloggers.
  4. Finally, the best rule of all, have fun and spread the love!

So today I am passing this award with this message: "I am loving what you are doing with your blog, and so keep doing it!  Together we will improve, increase our readership, and have fun!  Enjoy your Liebster award!"

1.  Katie at The Terpblog.  I read her blog because she is crafty, witty, and loves to run!  She has three kids- same ages as mine.  You may have seen her Owl Art several places lately.  She has been featured at several blogs recently!  
2.  Cath at Home Is Where My Heart Is.  It will not surprise you that this will be her second Liebster award either!  She has all kinds of goodness over on her blog, she is a very versatile crafter.  There are recipes, home decor, printables, gifts, etc.  She is a brand new blogger but already making her mark!  
3.  Randee at Randee's Organized Chaos.  This girl is a hoot!...Seriously!  I just met her and I love her!  She blogs about everything and it is fantastic!  I just recently got to sort of know her through participating in her blog critique and I am so glad I did!  
4.  Hilary at Measure Once, Cut Twice.  She is a new blogger and a newlywed!  Very exciting!   Already she is co-hosting a link party and participating in a Valentine's Blog Hop!  No wonder this is not her first Liebster Award : )
5.  Emily at BabyBerry.  I am sure she is as sweet in person as her blog is!  Just go see.  And she is really close to 200 followers so I had to give this to her soon : )  And if you need a new place to link up on Fridays, head on over to her party and say hello!


Monday, February 13, 2012

Master Bedroom Update {still work in progress!}


I have some great progress to share today!  I am done with part one of my master bedroom clean up project!  I am done with the "clean-up" part.  Now, comes the decorating part!  Ooh lala!  It was about a month ago that I didn't hold back and bared my messy room to the world...ok, to my blog readers who happened upon my blog that day!  But still.  I put it out there!  It was a tad embarrassing for me to do that BUT it has motivated me to stop putting off this project any longer.  We have *only* lived here for three years- you would think that is plenty of time to hang curtains!

But see, we are a military family.  We move more often than we'd like.  And I know that lots and lots of military wives/families are good about getting their new house decorated and to their liking-right away!  I am the opposite.  I always think, "why bother decorating, because we'll have to move again!"  (Great attitude, I know.) I don't want to paint any colored walls or change too much about our already bland house- because I want to sell it quickly when the time comes.  I am lazy have terrible logic, I know- I want a pretty house so people will *want* to buy it!   

Without further ado, here is the before:

~~ And here are the updates ~~
* I did not say "afters" because there is still a lot to do here.

Known problems with the above picture:  misplaced wall hangings, glass vase stuffed with packing paper on chest of drawers, need a table runner for the dresser, poster board sticking out, basket needs painted, and I really don't know about these two pieces of furniture together.  I like it but I don't think it's "correct".

Now THIS, is my $7 basket I bought at the new thrift store!  It just needs spray painted when the weather warms up.

Still need to fix here:  curtains, picture over bed, floating photos on the wall don't go there anymore, and the wall is blank.  I am picturing a small table against that wall.  I really want to find something I can paint a fun color.  Maybe I need to move my dresser back to that wall?  But I am liking the open feel right now over there.


Again, problems here: curtains (hello?), need better shams/pillows on bed, floating picture on the wall.  Oh and I just noticed the bedspread hanging out over the footboard- that is my husband's doing. He doesn't like to tuck it in.  But he makes the bed.  So I have to deal with it.  Or I could just start making the bed?

But what else?  The nightstands are actually storage cubes.  We were thinking of moving them to the blank wall and putting a cushion over them.  But we need nightstands.  It's pretty safe to say that I am on my own now with this project.  My husband helped move the stuff and declutter.  But we bought the new TV, so in his mind this room is done.  I am pinning lots of ideas here on my Master Bedroom Pinterest board.  If you have ideas to help me with this...leave me a comment...I'd love to hear/see!

Pin It

Thursday, February 9, 2012

Friday {5}:: Why I Have the Cleanest Washing Machine

Source:  Whirlpool.com
Maybe I am getting a little ahead of myself here.  But last Friday I had a repairman fix my washing machine (coin stuck in the pump).  He told me-- get this-- that I had the cleanest washer he had ever seen.  Say what?!  He was not talking about the outside either.  He was talking about inside this beast.  He showed me the water that came from the pump and it was perfectly clear.  He just dumped it right back inside the washer!  I guess usually, water plus a bunch of gunk comes out of the pump.  I told him ours wasn't that old and he said he has seen newer ones in worse shape.  And trust me- we have put our machine through the ringer with cloth diapers for just over two full years!  In case you wondered we have been done with diapers since September...first time in 7 years we have no diapers!

So here are my {5} Tips to a Clean Washer:

  1. No liquid fabric softener.  The repair guy told me it is just oil and most machines he sees have a huge black ring inside from it
  2. Half the laundry detergent.  I learned this from washing cloth diapers!
  3. Keep the lid open when not in use so the left over water in the drum can evaporate.  (I have a top loader so it is safe with the kids to do this!) 
  4. It doesn't hurt to wipe down the outside every once in a while.  I wipe inside, too, on the top of the drum where it gets dusty/gunky.
  5. I have an He machine and he recommended using a washer cleaner, such as Affresh, every six months.  I admittedly have only used that stuff once.  But  am going to use it now that I know how great our machine is.  I want to keep it that way.


Wednesday, February 8, 2012

{Pinned it, Did it!} Homemade Stain Remover

Hi, I'm Kate and I pit out shirts.

It's true!

Oh did we just meet?  So sorry!  But it's true!  I can't help it.  My husband does too.  Oh, but he is waaay worse!  I am sure he will appreciate me sharing his shirt pitting out abilities on the internet!  Ahahahaha!

So with two pitter-outers in the house, I was pretty excited when I found this recipe for a homemade stain remover on Pinterest, of course.  Did you see it, too?
This pic is from One Good Thing by Jillee (she did a full test and even has pic of her own before and afters!)

So I read the blog post here.  I saw the pictures.  They were good.  Convincing-good!  But I was skeptical.  I mean, we're talking about my pit stains.  And don't even think I haven't already tried everything to get rid of them.  Especially these (brace yourself, it's gross).

In the past, I have made concoctions of you-name-it and left it sit or soak overnight.  Basically I was putting in more effort than the old shirts were worth.  

Until this week, that is!


I mixed up a little "shot" of this:


Put it on the pits.  Rubbed it in real good.  I did find that using a brush to scrub the mixture in had considerably better results.

My shirts started like this:


Now the AFTERS!
Mine:
now, it's not totally gone but what is left is in the seams.


My husband's looked like this!!  I only did one pit so I could see the difference.  And it did require two washings.  The second time, I used the brush.
After one wash:


After two washes:
There are only traces of stains left on this one.  They are deep in the seams.  But the shirt is wearable again.

I am amazed!!! We will be switching to this as my main numero uno stain remover!!!  And seriously, it must cost pennies, too.  Now, should I do the other pit on my husband's shirt????  Ha- I owe him that I suppose for plastering his pit stains on my blog without him knowing about it.

Pin It

Linking Here:

Tuesday, February 7, 2012

Ideas to DIY Curtains

I didn't realize how long it would take to get this mess cleaned up...taking a bit longer than I imagined. But definite progress has bee made I can promise you that!  I bet if you ask my husband, he would actually say we are done. But we are not done.

I would say our previously-messy rooms are just about ready to decorate now.  They are rearranged and de-junked, but I still have a few things to tidy up in each of the rooms.  Then, the rooms need to be beautified!

It's going to be lots of work for me...I mean, I have to scour blogs, pinterest, and my favorite home decorating stores to come up with a decorating plan!  (Oh shoot.)  This could take some time- days just doing doing the re-con!

First I want to get curtains for our bedroom.  Since painting in not in our plan, I want to bring a little color into our room with some nice, simple curtains.

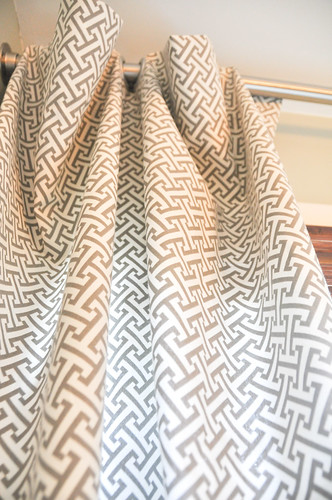
I like the simple geometric print of this fabric.  These curtains were a no-sew project and they have nice big grommets at the top!  I think I want grommets.

2011DSC_1047.jpg
source:  Brooklyn Limestone
Can you believe these were made from dropcloths?!  I love how relaxing they are!  Our bedroom is not formal and dressy...this might be the idea.
source:  Lovely Crafty Home


Here is a tutorial for stencil painting premade curtain panels. I love how these look, but I don't know if I will have the patience to make these. Or the time/space where kids won't mess with them.
source: Twenty Something 
Aren't these chevron curtains just dreamy! I really like them. These were made from fabric and lined with blackout lining. I won't need to go that far, but lining them would be a nice option.
source:  Midwest Magnolia
Come check out my Curtains board on Pinterest. I have more curtain ideas there and I am trying to accumulate more ideas as I see them. 

Soooo....If you have some nice curtains you have blogged about...leave me a comment with the link! I could always use more inspiration! Heck, while I am at it...I am looking for some kind of decoration to put on the wall above our headboard. Leave me a link to any of those ideas too, if you gottem!  That didn't sound too desperate? : )  heehee!

Pin It

Monday, February 6, 2012

{Shirt Fix} Too Large Blouse to Cute Fitted Blouse


Last week I scored this brown polka dot shirt from the Goodwill for oh, about $1.65.  (It was 50% off!)  Nothing big, a Target shirt is all.  But I really liked it.


I mean, not bad for less than two bucks, I know.  But I thought it could be a bit more fitted.  I wasn't going to mess with a big redo, but I had a blouse from Banana Republic and it was gathered in the back and I *thought* I could do the same with this shirt.  Actually, this project was a redemption project after I threw my huge massive "craft fail" in the garbage.  I still don't feel like talking about it. (Good thing I only wasted 3 hours of my life on that one. Grrrrr.)

Yes, it was late but I had to do something right last night...


First, I tried it on and grabbed the back of the shirt and pulled it back to see approximately how much I was going to need to gather.  It was going to be quite a bit for this shirt!  I also roughly decided where the gather should fall.  It was all guessing at this point, mind you.  I decided on 15.5" down from the collar.  I used my ruler to chalk a line across.

Then I sewed a gathering stitch (longest stitch) along that line.  (I figured if the gather was too high or low no biggie, it's a gather stitch, and could easily be pulled out!)  Next, I gathered it up as much as it would go.  And then tried the shirt on again.  I just loosened the gather until was how I wanted it.  Then I carefully took it off and laid it out like this:


My goal here was to get the gather symmetrical and straight.  The ends of my gather were 2 inches from each side seam.

Next, I cut a piece of ribbon about an inch longer than my gather.  (optional:  I singed then ends, too to prevent fraying.)  Then I folded the ribbon ends under and pinned the ribbon on top of the gather stitch.  

Next, I sewed the ribbon on.  I stitched along both edges of the ribbon and the short ends, like a big box.  Then I tried on the shirt and hoped for redemption it would fit the way it did in my head...


~~Love!~~

Pin It

Linked here:

Friday, February 3, 2012

Friday {5}:: Wear Red

February is not only the month of "love", but also National Heart Month.
source: American Heart Association


In support of National Heart Month, here is my Friday {5}::
Five (+1) Realistic Ways to Go Red!

Wear Red


Wear Red by craftwhatever from polyvore


1.  Bracelet by Betsey Johnson 2. Hair Ties by Cyndi Bands 3.  Scarf by Modcloth 
4.  Hoodie by Nike 5.  Shoes by Converse 6.  Tank top by Buckle

1.  I can throw a bracelet on with anything.  Everyday.  
2. Because I always have my hair pulled up.  
3.  These scarves can be worn with everything!  
4.  For my gym days.  
5.  Love my "chucks"!  
6.  Instant compliance with Go Red...throw it on under anything.  

Thursday, February 2, 2012

{Feature} Couponing Tips... at delicateConstruction!

I just can't help but feature this series by Michelle at delicateConstruction!


I am so excited to share this that I can't type this post out fast enough!

I have been reading Michelle's couponing advice all week and I was just bursting this morning when I saw this post about using a binder!  Because did you see my post yesterday about making a coupon holder for your binder????  Uh-huh!

All I could show you was how to make the pocket holder, I sadly, couldn't offer any solid couponing advice.  But check-it... Michelle has put together a very informative series of posts about couponing, giving us newbies the tools to get started on a money saving spree!  Her series includes:
Did you see?  She is a Binder gal...I am a Binder gal...we could be friends?
Only her binder looks like this!

And mine is only two pages.  I have a LOT to learn.  Already, I see that I need a 9-pocket page vs. my 4 and 6 pockets.

Pin It

Share this

LinkWithin

Related Posts Plugin for WordPress, Blogger...