Monday, April 23, 2012

{Tutorial} Sew a Skort from 2 Tshirts


My daughter is a "skirt girl" through and through!  But she is always doing non-skirt activities.  Like being upside down, for instance.  Leggings will work now, when it is cooler out.  We all know though, that "cooler" weather doesn't last long here in Oklahoma and in just weeks it will be permanent shorts, or for Stella, skorts weather!  

Yes, I know, skirts are just so dang easy to make!  I suppose I could always make her wear shorts under them.  OR I could just sew in shorts and not have to worry about her flashing her panties everywhere.  


{Tutorial} The 2 T-shirt SKORT

You need:
2 T-shirts and elastic for the waistband
AND as a template, a skirt and pair of leggings that currently fit


START WITH THE SHORTS

1.  Lay folded leggings on side fold of shirt.  Position so you have enough but not too much in seam.  I used 2 1/4” - 2 1/2” inseam (approx size 4/5).  The hem of the shirt will be the hem of the shorts!  Trace leggings on the shirt and add a seam allowance. 


2.  Cut 2 of these


3.  Sew short edges together on each piece, right sides together.  These = legs


4.  Turn one leg right side out and slip inside the other leg.  Align inseams.  Pin.  Sew inseam in one go.  Turn right side out.


NOW MAKE THE SKIRT
  • Lay out skirt on top of T-shirt; align the bottoms
  • Add for elastic and seam allowance (I added 3/4” for elastic + 1/2”)
  • Cut shirt straight across.  The wider the shirt, the fuller the skirt.


6.  Optional:  Turn inside out.  BUT I want to use the inside of the shirt as my skirt to hide the logo design.  So I am leaving mine Right Side Out.
7.  Cut elastic and sew ends together
{TIP}  Mark elastic with two lines- the other end and the cut line (about 1” from end line).  These two lines tell you where to overlap and sew.  

8.  {TIP} Sew a straight stitch as a guideline 1/2” from top edge.  I used a serger here as my guideline


9.  Mark quarters/quadrants/fourths on both elastic and top of skirt.  
I marked the elastic with pen and the skirt with pins.


10.  Pin skirt and elastic together at each quarter mark.  Align top edge of elastic with your guide stitch.  


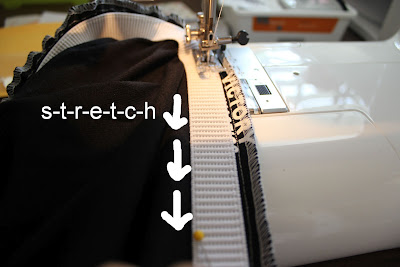
11.  Sew together by stretching elastic from pin to pin.  {TIP}  Start with a good backtack and keep needle down between sections.  

 {TIP} To keep the gathering even-ish I like to stretch out the quarter section and then move my hold to the midpoint.  I then sew each quarter section in two parts.  Stretch elastic with one hand and pull through the machine with the other.  


12.  Mark the top of the shorts at the quadrants (2 seams & 2 sides).  Align the quad-marks of the shorts with the quad marks of the elastic.  Pin at the 4 quad-points.  
I did switch my thread at this point to match the skirt. Probably should have done that from the start, yes. 

13. Fold elastic down over shorts and in the same way in step 11, stretch and sew.

{TIP}  Hold the quad mark and pull.  Then rehold at the midpoint, pinching all layers together.  THEN I reach inside the skirt and pull the shorts down to about the center of the elastic, THEN tug the skirt to get a nice fold over the elastic.


14.  Add a tag or slip a piece of ribbon in as you finish sewing the waistband to help your kids know the back of the skort.  I used a printed ribbon as a tag this time.

Ta-Da!
Pin It
Linking to these *fabulous* parties!

Todays Creative BlogTip Junkie handmade projects

Thursday, April 19, 2012

So Grateful for Family...

Can I just say how much I appreciate all the ideas I got this week about new running songs!  I can't wait to download some new tunes!  In the meantime, I had to settle for the same mix this morning. But I started the playlist in the middle and it seemed to be better.  But I do need a new playlist.  So thanks for all the help!

Right now, I am typing up drafts of posts for the next couple of weeks.  I feel like I have been making and doing...but dragging my feet on the posting part.   

  Today Grandma is coming to visit!!!  Which is very good thing!!  When family comes, we try and get caught up with stuff around the house (crash-course style).  

It also means I will have to pack up my sewing stuff and craft junk to make room for an air mattress.  Our office my sewing room is used for many things- including a guest bedroom when we have guests visiting!  And when we have family visiting it usually means there are some big things going on and we just don't have enough grown ups around to accomplish them.  By that I mean we need kid-watchers!  We also try to ramp up our home projects while we have help with the kids.  We have a lot of yard work that we are hoping to get done.  I have a consignment sale that I need to get ready for.  I have to go out of town.  I need a haircut and color.  School fundraiser this weekend.  And hopefully we can squeeze a date night in there somewhere between gymnastics lessons and baseball games and piano lessons.

***************************

Do you have family who live nearby?  How does that work? I always wonder what it would be like to live near family.  Do they help with watching the kids on a regular basis or just when it is something big?  Our neighbors watch their grandkids every weekend so the parents can have a night off.  I'll admit, it would be nice to have help nearby since my husband is traveling so much.  If I had a day/night off, I don't know what I would do first - schedule a haircut, grocery shop, clean the house, nap, sew, see a real movie, dinner date, go for a long run?  

Wednesday, April 18, 2012

Coming Soon...a Skort Tutorial

  My daughter is a "skirt girl" through and through!  But she is always doing non-skirt activities.  Like being upside down, for instance.  Leggings will work now, when it is cooler out.  We all know though, that "cooler" weather doesn't last long here in Oklahoma and in just weeks it will be permanent shorts, or for Stella, SKORTS weather!  

So I made her a couple of new SKORTS. 


 I know skirts are so simple, but for just a bit more effort (just a bit) I could sew a skort and not have to worry about her flashing her panties everywhere.   They are so dang easy to make, too!

Oh and there's those blue shoes again!


I am working on a couple tutorials for you.  There isn't much out there in the area of skorts.  Making one is easier than you think.


If you subscribe by email then you may have already seen my outline for the tutorial post!  UGH.  I copied and pasted text and accidentally hit post.  I took it off immediately, but how embarrassing.  

Check back for the TWO tutorials I am putting together.  In the meantime, gather up some old t-shirts, cotton and knit fabrics, some elastic, and a good fitting pair of leggings!

Pin It

Monday, April 16, 2012

{Handy-Woman Tip} A Simple Toilet Repair

It is a pretty odd handy-woman skill that I know but wanted to share with you because I have done this one a bunch of times and feel pretty confident about it.

First, please trust me when I say, toilets are not complicated.  Gross, yes, so I always give mine a good cleaning before I have to get this personal with it.

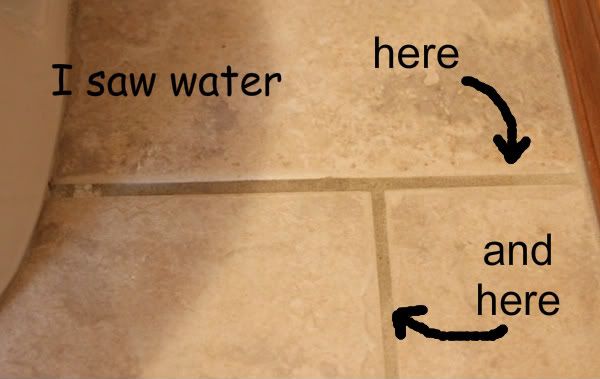
Problem:  A few weeks ago, I noticed the grout was darker around my toilet.  I cleaned it.  My first thought was that the boys were going and missing in my bathroom.  But that wasn't the case.  I knew it was the other problem- water under my toilet.  And the answer was most likely, and most cheaply, a new wax ring.  This repair is going to cost somewhere between $1-$6.

{Handy-woman} Solution:  Replace Wax Ring on Toilet
1.  If your toilet is caulked around the bottom (and it probably is) remove all the caulk.  I just scrape it off with a metal putty knife.  2.  Turn off water at the wall.   
3.  Flush toilet until won't flush anymore.   4.  Remove water from tank and bowl.       I use a cup to scoop out the water.  When that isn't efficient anymore, I use a towel or sponge to soak up the water and wring it into a bucket.   5.  Now detach water line from tank.  I had a bit of a problem with the waterline this time.  Even though I felt like it was turned all the way off, water was still dripping out.  I used a cup and towels to catch the water vs. tightening it more.  I am just overcautious after breaking one of those before (different house).  6.  Remove the nuts from the toilet bolts.  They are under those white caps, which just pop off.  **If the bolts look rusted out you will need to replace them as well.  You can buy the repair kit that includes the bolts or get them separately.  Only problem with the bolts is that sometimes they are too long and will need cut.
Before you move on, you are going to need some wadded up newspaper, a spot to put your toilet (against a wall works well), and probably a helper.  A toilet is pretty heavy and you don't want to put any pressure on the back tank!  Lift from the bowl so the tank doesn't crack.  Remember to handle the toilet carefully in the next steps so you don't crack any porcelain.  

At this point, I call for my helper- who was folding laundry.  That's right.  My husband did the laundry while I fixed the toilet.  We laugh pretty good about that!   Just like on Saturday, I fixed the gutters and he watched the kids.

OK back to business...
7.  Give your toilet a side-to-side jiggle to make sure it is loose and lift it STRAIGHT UP over the bolts.  

Now stuff some paper in that hole!  Keeps gross air out.  **Remind yourself to REMOVE that paper before you put the toilet back!

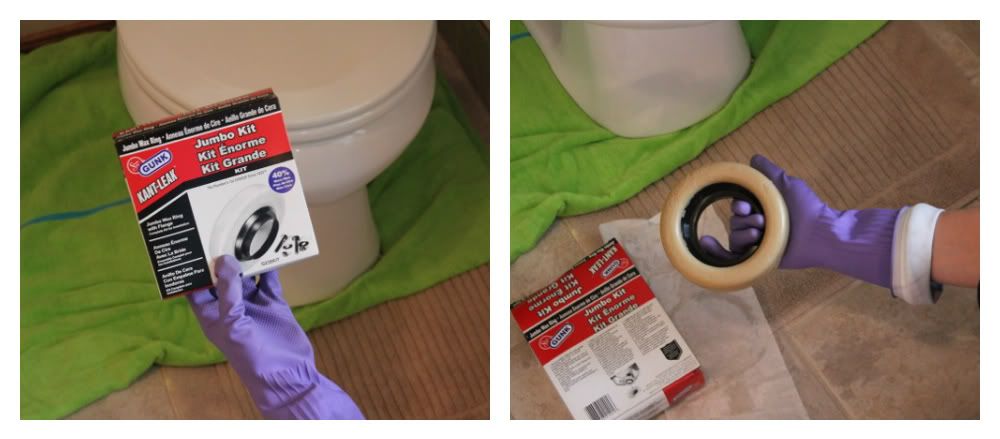
Now we will replace the wax ring.  Funny, my husband bought it, but I did the whole repair.  He chooses the jumbo size because in our first house we needed that one due to the floor being uneven under the toilet.  Back then, we used two regulars stacked together.  However, in this house we really don't need the jumbo.  It just means more squishing on (see below).

8.  Remove the old wax ring.  I use the putty knife.  Sometimes the ring might be on your floor but usually it is stuck under the toilet- where it should be.  

9.  Take the new wax ring and squish it right on the bottom of the toilet.  Center on the hole as much as possible.  (There is also the "cheater way" where you put the ring over the hole and squish the toilet on.)
10.  Put the toilet back where it goes.  **Remove that paper!**  CAREFULLY align directly over the bolts and press down super slowly and very evenly.  Stand over the toilet and press straight down to squish the wax.
Test it first.  TRUST ME.  I have done this repair before only to have water seeping out from the bottom on the first flush!
11.  TEST your work:
a.  reconnect waterline to the tank and fill the tank about half way.
b.  flush and look around the bottom
c.  let the tank fill completely and flush again.  and again.  and maybe once more for good measure.
d.  if you don't see water on your floor, you are in good shape!  If you do, I am so sorry, but you are going to have to turn off the water and start over.  You may or may not need a new ring.  
12.  Tighten your toilet bolts- do not over tighten!  Do a couple turns on the right then a couple on the left, alternating until it is tightened.
13.  Recaulk when floor is dry...I like to wait a few days before I recaulk.  Just to be sure!  Again, speaking from experience.  


And yes, I am linking up a post about toilets to these fabulous parties:
BWS tips buttoncraft MakingThe Girl CreativeKeeping It Simple


Friday, April 13, 2012

{Friday 5} Running Songs

...and some random running pictures!
This is my sister, Martha, who organizes our family to run the "turkey trot" every Thanksgiving morning!  This photo is from 2009.
I realized this week that I need new running songs.  Badly.  Mine are just not doing anything for me lately.  Yes, maybe the problem is that I have been listening to the same music for, oh, I don't know... 3 years!!!  I am not kidding.

Despite their "oldness" these are presently my {5} favorite running songs:
1.  Sexy Back- Justin Timberlake
2.  Poker Face- Lady Gaga
3.  Telephone- Lady Gaga
4.  I Gotta Feeling- Black Eyed Peas
5.  I Wanna Go- Britney Spears 

(My shuffle also includes Take Me on the Floor-  Veronicas, more Britney, and some Katy Perry. I just added the Britney Spears in October so those still sound like new to me.)

See a trend?  Or rather, the problem?  So I am trying to come up with some new songs that are totally *now* so I can listen to them for the next three years!  I don't really listen to the radio but last weekend I was on Pandora while I did the taxes (which are now done! thankyouverymuch) and I only wrote down one song that I really wanted to add to my mix.  It was Blow by Ke$ha.  Hey, don't judge.  I don't even know who these people are...I just like to run to the songs!
October 2004
I was SO 8 1/2 months pregnant here!

So DID I get your attention with that photo? Ha!
Please,
I desperately need some fun new songs that make me feel like kicking ass! 

Any suggestions?

Wednesday, April 11, 2012

{Tutorial} Glittery Shoes


My daughter's shoes were getting a bit roughed up and I really had to stop filling in the scuffs with my Sharpie as she left for school in the morning.  I had two ideas:  spray paint and glitter!

Oh did she looooove both ideas as much as I did!

I had seen glitter shoe tutorials before, and I knew the basics: Mod Podge and glitter.  But I wasn't sure about the order in which to apply them and what do I do about things like straps and buckles and cute flowers on the shoes?  I mean do I mix the Mod Podge and glitter together and paint it on?  Or should I paint on the Mod Podge and sprinkle the glitter on?  Here is what I found that worked best for me!

I started with these...

and turned them into these...

and it was pretty easy!

{Tutorial} for Glittery Shoes (with straps and stuff)

1.  Prep your shoes by stuffing with plastic bags and taping off parts you don't want glittered.  I unbuckled the strap and let it hang out.  I taped off the velcro on the straps, too!
2.  Put about a tablespoon of glitter in a plastic cup or something you can pitch when you are done.  I mixed three colors of glitter here- all Martha Stewart glitters.
3.  Add a blob of Mod Podge to the glitter and mix with paint brush until is it a thick mixture of the two.  At first it will be dry but keep adding small blobs of the glue until it is a paintable glitter.  When you paint it on the shoe, work in small areas at a time.  **I found this works better than adding the glitter to the glue because I couldn't estimate the glue and had to dump a ton of glitter in or paint on a bunch of coats to get it as glittery as I wanted.  And I wasted a lot of glitter by painting Mod Podge on first then sprinkling glitter on it.
I started at the toe and worked back.  I glittered the strap last.  And don't get any glue on the flower, if you have one.
4.  As they are drying you can add more glitter to any spots you missed.  For touch ups on the toes, I painted on only Mod Podge and then sprinkled glitter to really get them sparkly!  Repeat the layers until they look glittery enough for you.
5.  When the main color was dry, I smothered the flower with Mod Podge and poured silver glitter in every nook and cranny.  I let it set up just a minute then shook off the glitter.


6.  After they are dry...Lastly, I added two thin coats of just Mod Podge over the entire shoe.

When they are completely dry (patience...) carefully remove the stuffing and the tape.  I had to use my fingernail to keep the tape from pulling off the good stuff.  Just go slowly.  Trust me.


I think these shoes are pretty durable.  The Mod Podge kept them flexible enough for a five-year old to run around in them.   I think the thin layers of the glue helped also.

Have you glittered any shoes for yourself or kids?  I would like some glitter just on the toes of shoes for me.

ALSO,  this is My entry into Thrifty Thursday is sponsored by Appliances Online and the Bosch Washing Machines.

Pin It
Linking to these fabulous parties:
Somewhat SimplePhotobucketA Crafty Soiree Transformation ThursdayThriftyThursdayModernButton1 SBLC ButtonsThe 36th AVENUE
Catch a Glimpse ButtonPhotobucketBWS tips buttoncraft MakingThe Girl CreativeKeeping It Simple

Share this

LinkWithin

Related Posts Plugin for WordPress, Blogger...