Showing posts with label holiday. Show all posts

Monday, April 9, 2012

Happy Easter and Weekend Wrap Up


Hope you all had a wonderful Easter weekend!  We definitely DID!  Yesterday afternoon we got together with friends and had a very delicious meal!  Every year I am responsible for making this dessert called Cherry-Berries on a Cloud.   I only make this once a year for Easter because it is quite involved.  Once I get to eat a bite of it, I remember why I am asked to make this every.single.year.  It is so good that it is worth all the fuss to make it!  I promise!

Here is the recipe.  It is from Betty Crocker.  Only thing I do differently (because I am lazy) is I use a whole 8oz package of cream cheese vs. the 6oz the recipe calls for.   It is a recipe that I start making on Saturday morning for an Easter supper!

In addition to making this fabulous dessert and some other side dishes to bring to the dinner I was also busy working on my front porch area...

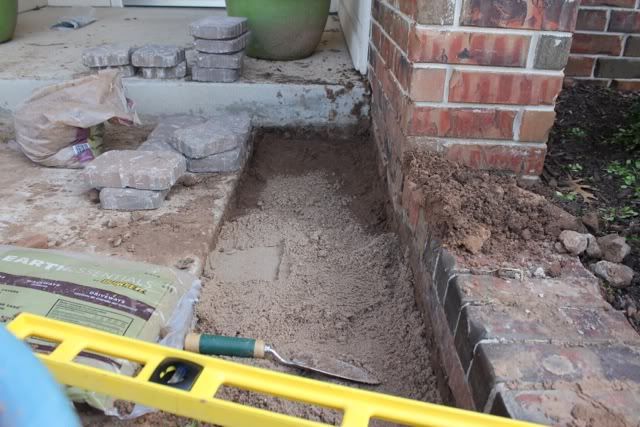
Friday I started laying pavers to solve my nothing-grows-here-so-my-kids-are-always-digging-up-my-front-yard problem.

It took me a while to dig the area up, a good 5-7 inches deep.  And my kids were off school so you know I got *so* much help!  They did think they were helping.  The rest of my Friday looked like this: a trip to the hardware store, a quick dinner, baseball practice, then I totally forgot that I volunteered to work the nursery at church (it worked out that no kids came...but still!  I was so embarrassed.), more paver work, quick shower, and then off to the grocery store at 9pm to do the shopping for Easter and the week.  My back is still aching from shoveling the heavy mud.  I got one side laid out and I still have to cut the pavers for the other side.

Earlier on Friday I went to yoga, finished up a little sewing...
I have been working on a few sewing projects for my daughter, Stella.  This one is a cute skort.  I will be putting a tutorial together for you real soon.  I made a couple different skorts last week!

Saturday I did our taxes all.day.long.  Except for the parts where I made that fabulous dessert!  Our taxes aren't hard to do.  I do them every year.  But our paperwork was a mess and I had a lot to update in our accounts before I could make much progress.  Do you do your own taxes?  Am I the only one??

Oh, then of course I had to get ready for Easter morning!  Putting candy and little toys in baskets because the kids love this on Sunday morning!

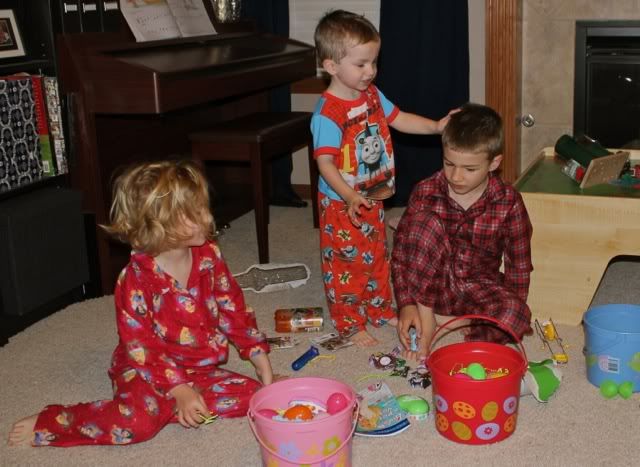
The rest of Sunday was church, finishing up food, and snapping some pictures of the kids in the backyard.  I totally wish I knew how to edit these to look awesome!


Things we didn't get done and are on my to-do list this week:  fix leaking toilet, fix leaking gutter, finish pavers, finish and file the taxes, get oil changed in van and alignment fixed, cleaning, & drop off recycling.  Not sure what I will get done with three baseball games this week for Nicholas and a gymnastics lesson for Stella.

The kids don't have school today so I am not sure what we will get into!  I really want to see if the new library is open.  Or maybe we will hang out here and they can help me split pavers!

Thursday, December 15, 2011

Our Random "Mish-Moshy" Christmas Tree

Before I get started about my tree decorations... I thought I would share this Shabby Apple dress giveaway over at Pitter and Glink.  Their dresses are stylish and stunning!  Go over and enter...you might win the dress!
Now, on to the tree...

I am always interested in how other people decorate their Christmas tree.

Pretty and Formal?
Pretty and Handmade?
Pretty and Kidmade?
Pretty and Color-themed?
Pretty and Mish-moshy?

That last one is ours...Mish-moshy.  Like how I threw "pretty" in there to make everyone feel good about their trees?  It IS Christmas...

We once had a pretty red and gold tree.  You know the kind- white lights only.  Every branch balanced.  Obviously this was before we had kids!

For many, if not all, of the last seven years, we did not even decorate the last foot or so of the tree because babies don't mix well with Christmas ornaments!  This year, we were clear to decorate every square inch of the tree.  And we had three little helpers to accomplish that!  

Our ornaments fall into a four basic categories:  Made by a kid, From someplace we have been, Things we like, and Fillers (plain ball ornaments to fill the "holes" in the tree and usually hold no significant meaning).

These hold lots of meaning...Have a look!

Yes, pretty random.  But we did visit this crater- it's in Arizona.

Denali National Park, Alaska
"Hang Ten, Santa!"
Key West, Florida.  
The cross-eyed reindeer and Angel without facial features would fall in the "kidmade" category.


Another Beautiful kidmade (well, the kid made the drawing, an adult did the rest) ornament.  Nothing says Christmas like a GI Joe battle scene.
My husband is a North Carolina basketball fan.
We never miss a "Charlie Brown Christmas" special on TV!

Friday, December 2, 2011

{The Friday 5}:: What I Wish I was making right now


Oh how I wish I had a few hours free to make something.  Anything.  I would prefer to make something for Christmas (obviously)!  Instead, I am drooling over these ideas I found.  Most of them I have already made in my head. 

1.  The most gorgeous Ribbon Wreath, from bhg.com


2.  This darling “Gift Wrap Garland Christmas Tree”, from Sew Woodsy

3.  A burlap Banner, from Story Crafting with Joy.
(I like this so much, I would probably make mine a giant-size!)

4.  Felt Flowers (galore!), from Craftiness is Not Optional
In my mind, I have already made about 4 dozen of these.


And again, in my head, I have already made these and eaten 3.  

Happy Crafting!  

Wednesday, November 30, 2011

{Tutorial} Advent Calendar, a Felt Wall Hanging


If you stopped by yesterday, I showed you my Advent Calendar that I made last year.  And then I promised you a "how-to" for it today.  Well, I rounded up some pictures I took while I was making it and collaged them to give you a quick tutorial.


I promise you, I just whipped this up.  On the 30th of November.  I finished all but assembling the ornaments, to include the hand sewing of the numbers.  But by the 5th it was complete.


  {Tutorial by Pictorial} Advent Calendar- Felt Wall Hanging

To make this I used:  fabric for the background, felt, interfacing, heat and bond, scrapbooking brads, rick rack, and embroidery thread.
1.  Grab some supplies.  2.  Decide on a size for the tree and base everything else off that.  3.  Cut two felt trees; light and dark green.  4.  Cut each in 3 pieces- take into account 1" of overlap when you plan your cuts.  Or not and just wing it!  5. Attach the thirds, bottom edges overlap.  You will only use three pieces of trees here.  I cut strips of Heat and Bond to attach them.  6.  Decide where you want your brads to go.  7.  Poke brads through the felt.  8.  I thought it could use some garland (rick rack).  9.  Again, I used tiny strips of heat and bond to hold in place.  Then sew down the rick rack.


10.  Lay out tree on background fabric and mark your lines for the ornaments to hang on the bottom.  11.  Sew some trim (rick rack) along the horizontal lines.  12.  It's probably safe to attach the tree now!  I cut pieces of Heat and Bond to hold it in place.  12.  Then sew the felt tree to the background.  13.  Add brads to the horizontal rows.  14.  Make a backing piece and line with a medium to stiff interfacing.  13.  Sew backing to the front panel.  I did 3-rows of stitching to be "decorative".  15.  Make a casing at the top for a dowel to slide in.  16.  Make some felt ornaments.  25 to be exact!

It isn't too too late to start this.  You can get the tree part done pretty fast.  Then just make the ornaments.


Linking here:
Somewhat SimpleA Crafty Soiree Transformation ThursdayThriftyThurs Thrifty Thursday Week 3436th AvenueCatch a Glimpse Button

Tuesday, November 29, 2011

Advent Calendar (my felt creation from 2010)

Hey!  Good to be back after such a whirlwind Thanksgiving Break!  We drove to be with our family- an 18 hour drive- and we drove it all in one day!  Holy cow!  Left at 3:30am (Central Time) and pushed on until 10:30pm (Eastern Time).  With three kids...I still don't know how we did it!  We drove it in two days on our way back.  (We aren't that crazy!)  But now it is back to the grind at home.  We have been feverishly putting up Christmas decorations before my husband has to go out of town again.  


I pulled this little beauty out of a storage bin today!

It's my:
 Homemade Advent   Calendar.

 I made this last year just off the cuff!


And I started it just hours before we needed to start using it!


I still remember buying all the supplies with only a vague idea of what I wanted it to look like.  For weeks, though, I had been admiring  this one which was inspired by this one.  (These two are beautiful and neat and perfection!)  I decided not to set myself up for failure disappointment, and took a more relaxed approach.  
I was going for a crafty-felty-whimsy-colorful motif!  


I remember I was dreading all of the hand-sewing that was involved (because I am quite allergic to that!).  But then I found it was actually much easier than I was imagining!

Come back tomorrow and I will show you how I made this!  I am working on a pictorial for it right now.  You will see how simple it is to make!
Linked here:
Photobucket

Sunday, October 30, 2011

Cake Walk Goodies ~~Ideas I got from Pinterest!

Last Friday was a Halloween Carnival at my kids' school.  I had to bake a couple of somethings for a cake walk and so I scoured Pinterest for ideas.  I ended up making this:


 which is a take-off of this:
Found this at Nothing But Country

And this:
Brownies with Buttercream Frosting Brains

Just brownies and buttercream "brains"

which is a take-off of this:

Found this on Living Locurto
Obviously, I used her free printables, too!


For me, this was a multi-day project.  My first hurdle was finding the cups and lids.

I finally found the cups and lids at one (of the five near me) Sam's Club.  Even though I didn't want the domed lids, I had to take anything I could find and make it work.

Then of course, there was lots of baking, frosting making, decorating, and paper cutting to do.  But the hardest part was keeping the spoons stuck on the cups.  Not sure what I was doing wrong.  I used glue dots and curling ribbon.  For a day and a half all I did was reaffix ribbon and spoons.  So even though I have 450 domed lids left over, I will not make these again until I can figure out something better for the spoons.


All the goodies ready to go to school!  3,000 glue dots later!

Linking Here:
craft MakingThe Girl CreativeKeeping It Simple

Share this

LinkWithin

Related Posts Plugin for WordPress, Blogger...