Showing posts with label Sewing. Show all posts

Monday, April 23, 2012

{Tutorial} Sew a Skort from 2 Tshirts


My daughter is a "skirt girl" through and through!  But she is always doing non-skirt activities.  Like being upside down, for instance.  Leggings will work now, when it is cooler out.  We all know though, that "cooler" weather doesn't last long here in Oklahoma and in just weeks it will be permanent shorts, or for Stella, skorts weather!  

Yes, I know, skirts are just so dang easy to make!  I suppose I could always make her wear shorts under them.  OR I could just sew in shorts and not have to worry about her flashing her panties everywhere.  


{Tutorial} The 2 T-shirt SKORT

You need:
2 T-shirts and elastic for the waistband
AND as a template, a skirt and pair of leggings that currently fit


START WITH THE SHORTS

1.  Lay folded leggings on side fold of shirt.  Position so you have enough but not too much in seam.  I used 2 1/4” - 2 1/2” inseam (approx size 4/5).  The hem of the shirt will be the hem of the shorts!  Trace leggings on the shirt and add a seam allowance. 


2.  Cut 2 of these


3.  Sew short edges together on each piece, right sides together.  These = legs


4.  Turn one leg right side out and slip inside the other leg.  Align inseams.  Pin.  Sew inseam in one go.  Turn right side out.


NOW MAKE THE SKIRT
  • Lay out skirt on top of T-shirt; align the bottoms
  • Add for elastic and seam allowance (I added 3/4” for elastic + 1/2”)
  • Cut shirt straight across.  The wider the shirt, the fuller the skirt.


6.  Optional:  Turn inside out.  BUT I want to use the inside of the shirt as my skirt to hide the logo design.  So I am leaving mine Right Side Out.
7.  Cut elastic and sew ends together
{TIP}  Mark elastic with two lines- the other end and the cut line (about 1” from end line).  These two lines tell you where to overlap and sew.  

8.  {TIP} Sew a straight stitch as a guideline 1/2” from top edge.  I used a serger here as my guideline


9.  Mark quarters/quadrants/fourths on both elastic and top of skirt.  
I marked the elastic with pen and the skirt with pins.


10.  Pin skirt and elastic together at each quarter mark.  Align top edge of elastic with your guide stitch.  


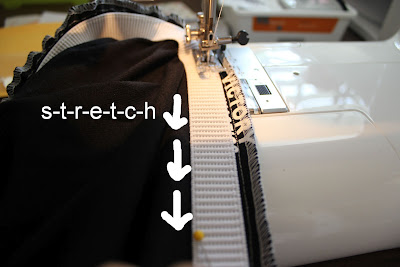
11.  Sew together by stretching elastic from pin to pin.  {TIP}  Start with a good backtack and keep needle down between sections.  

 {TIP} To keep the gathering even-ish I like to stretch out the quarter section and then move my hold to the midpoint.  I then sew each quarter section in two parts.  Stretch elastic with one hand and pull through the machine with the other.  


12.  Mark the top of the shorts at the quadrants (2 seams & 2 sides).  Align the quad-marks of the shorts with the quad marks of the elastic.  Pin at the 4 quad-points.  
I did switch my thread at this point to match the skirt. Probably should have done that from the start, yes. 

13. Fold elastic down over shorts and in the same way in step 11, stretch and sew.

{TIP}  Hold the quad mark and pull.  Then rehold at the midpoint, pinching all layers together.  THEN I reach inside the skirt and pull the shorts down to about the center of the elastic, THEN tug the skirt to get a nice fold over the elastic.


14.  Add a tag or slip a piece of ribbon in as you finish sewing the waistband to help your kids know the back of the skort.  I used a printed ribbon as a tag this time.

Ta-Da!
Pin It
Linking to these *fabulous* parties!

Todays Creative BlogTip Junkie handmade projects

Wednesday, April 18, 2012

Coming Soon...a Skort Tutorial

  My daughter is a "skirt girl" through and through!  But she is always doing non-skirt activities.  Like being upside down, for instance.  Leggings will work now, when it is cooler out.  We all know though, that "cooler" weather doesn't last long here in Oklahoma and in just weeks it will be permanent shorts, or for Stella, SKORTS weather!  

So I made her a couple of new SKORTS. 


 I know skirts are so simple, but for just a bit more effort (just a bit) I could sew a skort and not have to worry about her flashing her panties everywhere.   They are so dang easy to make, too!

Oh and there's those blue shoes again!


I am working on a couple tutorials for you.  There isn't much out there in the area of skorts.  Making one is easier than you think.


If you subscribe by email then you may have already seen my outline for the tutorial post!  UGH.  I copied and pasted text and accidentally hit post.  I took it off immediately, but how embarrassing.  

Check back for the TWO tutorials I am putting together.  In the meantime, gather up some old t-shirts, cotton and knit fabrics, some elastic, and a good fitting pair of leggings!

Pin It

Wednesday, February 22, 2012

{Pinned It, Did It} A Baby Bib

Oh I have had this one pinned for quite a while, just *waiting* for someone to have a baby girl so I could make it!  Then it still took me a couple more months to actually make it, wrap it, send it...OH and ask my friend to send me pictures because I forgot to take them myself!

And...Isn't she a cutie?!
In case you are wondering- this is my friend's baby!  You can already tell by those fingers how adorable she is!!!!!  The bib is still a little big, but she is only going to grow, right?  The back of it was made with a soft pink flannel.  I found both fabrics at Hobby Lobby.

Here is the original post by Jess at Craftiness Is Not Optional.  
She has a free pattern, too.
Source:  Craftiness Is Not Optional
-------------------------------------------------------------------------------------------

And, I just can't resist the chance to gush about one of my favorite blogs, too:  Craftiness is Not Optional

If you think this is cute, you need to stop by her blog.  Jess is very, very talented at sewing!  Her little girl dresses make me wish that I was a size 2T so I could fit into them!  I love every single thing that girl makes!

All I can say, is do NOT be surprised if you find me in a shirt like this one day!
I will find a way to supersize it to fit me.
Source:  Craftiness Is Not Optional


Pin It

Monday, February 6, 2012

{Shirt Fix} Too Large Blouse to Cute Fitted Blouse


Last week I scored this brown polka dot shirt from the Goodwill for oh, about $1.65.  (It was 50% off!)  Nothing big, a Target shirt is all.  But I really liked it.


I mean, not bad for less than two bucks, I know.  But I thought it could be a bit more fitted.  I wasn't going to mess with a big redo, but I had a blouse from Banana Republic and it was gathered in the back and I *thought* I could do the same with this shirt.  Actually, this project was a redemption project after I threw my huge massive "craft fail" in the garbage.  I still don't feel like talking about it. (Good thing I only wasted 3 hours of my life on that one. Grrrrr.)

Yes, it was late but I had to do something right last night...


First, I tried it on and grabbed the back of the shirt and pulled it back to see approximately how much I was going to need to gather.  It was going to be quite a bit for this shirt!  I also roughly decided where the gather should fall.  It was all guessing at this point, mind you.  I decided on 15.5" down from the collar.  I used my ruler to chalk a line across.

Then I sewed a gathering stitch (longest stitch) along that line.  (I figured if the gather was too high or low no biggie, it's a gather stitch, and could easily be pulled out!)  Next, I gathered it up as much as it would go.  And then tried the shirt on again.  I just loosened the gather until was how I wanted it.  Then I carefully took it off and laid it out like this:


My goal here was to get the gather symmetrical and straight.  The ends of my gather were 2 inches from each side seam.

Next, I cut a piece of ribbon about an inch longer than my gather.  (optional:  I singed then ends, too to prevent fraying.)  Then I folded the ribbon ends under and pinned the ribbon on top of the gather stitch.  

Next, I sewed the ribbon on.  I stitched along both edges of the ribbon and the short ends, like a big box.  Then I tried on the shirt and hoped for redemption it would fit the way it did in my head...


~~Love!~~

Pin It

Linked here:

Wednesday, November 30, 2011

{Tutorial} Advent Calendar, a Felt Wall Hanging


If you stopped by yesterday, I showed you my Advent Calendar that I made last year.  And then I promised you a "how-to" for it today.  Well, I rounded up some pictures I took while I was making it and collaged them to give you a quick tutorial.


I promise you, I just whipped this up.  On the 30th of November.  I finished all but assembling the ornaments, to include the hand sewing of the numbers.  But by the 5th it was complete.


  {Tutorial by Pictorial} Advent Calendar- Felt Wall Hanging

To make this I used:  fabric for the background, felt, interfacing, heat and bond, scrapbooking brads, rick rack, and embroidery thread.
1.  Grab some supplies.  2.  Decide on a size for the tree and base everything else off that.  3.  Cut two felt trees; light and dark green.  4.  Cut each in 3 pieces- take into account 1" of overlap when you plan your cuts.  Or not and just wing it!  5. Attach the thirds, bottom edges overlap.  You will only use three pieces of trees here.  I cut strips of Heat and Bond to attach them.  6.  Decide where you want your brads to go.  7.  Poke brads through the felt.  8.  I thought it could use some garland (rick rack).  9.  Again, I used tiny strips of heat and bond to hold in place.  Then sew down the rick rack.


10.  Lay out tree on background fabric and mark your lines for the ornaments to hang on the bottom.  11.  Sew some trim (rick rack) along the horizontal lines.  12.  It's probably safe to attach the tree now!  I cut pieces of Heat and Bond to hold it in place.  12.  Then sew the felt tree to the background.  13.  Add brads to the horizontal rows.  14.  Make a backing piece and line with a medium to stiff interfacing.  13.  Sew backing to the front panel.  I did 3-rows of stitching to be "decorative".  15.  Make a casing at the top for a dowel to slide in.  16.  Make some felt ornaments.  25 to be exact!

It isn't too too late to start this.  You can get the tree part done pretty fast.  Then just make the ornaments.


Linking here:
Somewhat SimpleA Crafty Soiree Transformation ThursdayThriftyThurs Thrifty Thursday Week 3436th AvenueCatch a Glimpse Button

Share this

LinkWithin

Related Posts Plugin for WordPress, Blogger...